Transferring data from field devices through Prosys OPC UA Historian to the cloud using AWS IoT Greengrass and SiteWise
Introduction
This guide will be demonstrating how to set up AWS Greengrass deployed with the IoT SiteWise Gateway connector in order to transfer node data to the IoT SiteWise service, from which we can use the data in other AWS services as we wish. Greengrass allows us to run lambda functions locally on our so-called core device using the Greengrass core. Instead of defining the lambdas ourselves, which would allow transmission of the node data to the AWS service, we can instead use the IoT SiteWise connector gateway. This allows us to quickly and without coding, get the connection between our Prosys OPC UA Historian server and the cloud up and running.
Our goal in this demonstration is to transfer node value updates from our Prosys OPC UA Simulation Server to the AWS, more specifically, a simulated value from the node Counter1.
First and foremost, we’ll be quickly going through Prosys OPC UA Historian, how to add our Prosys OPC UA Simulation server as a source server, and the benefits of using Prosys OPC UA Historian as a gateway between AWS provided services and our underlying OPC UA servers.
After that, we’ll be setting up AWS IoT Greengrass as a docker container. The following steps are required for this to happen:
Setting up the AWS CLI
Getting the Greengrass Docker container image from Amazon ECR
Creating and Configuring the Greengrass group and Core
Running the Greengrass container image locally
After we have gotten the docker container up and running, we are going to take the following steps in order to run and connect the SiteWise gateway on our docker container and the AWS console:
Setting up the gateway inside the docker container
Creating an IAM Policy and Role
Attaching an IAM Role to an AWS IoT Greengrass Group
Configuring the AWS IoT SiteWise Connector
Adding the Gateway and Configure Sources
Add assets and models
Prerequisites
- Docker, version 18.09 or later. Earlier versions might also work, but version 18.09 or later is preferred.
- Python, version 3.6 or later.
- pip version 18.1 or later.
- Prosys OPC UA Historian
- An OPC UA server of personal choosing to provide data. In this guide, we’ll be using Prosys OPC UA Simulation Server
- An OPC UA client, such as Prosys OPC UA client for Android
NOTE!
A client is optional, but useful in determining the structure of the address space we’ll be working with. We’ll need to know the correct path to the nodes we wish to access from AWS when mapping AWS IoT SiteWise models to actual nodes in the server address space.
- AWS account created with administrator user with administrator group privileges
IMPORTANT!
When selecting the AWS access type for the administrator account, select Programmatic access. When the account has been created, save the Access key ID and Secret access key as we will need them to configure the AWS CLI. Log in to the newly created AWS account using the instructions shown on the screen.
Setting up Prosys OPC Historian and Simulation Server
Prosys OPC UA Historian is an OPC UA client/server application, which allows us to easily collect and store data in real-time into a SQL database. In addition, it provides a simple way to aggregate multiple underlying servers into a single point of access, which enables a simpler system architecture and tighter firewall rules resulting in a more secure system implementation. Historian is available as a free evaluation version. This version requires a restart of the Historian service every 2 hours, which is useful to keep in mind if things aren’t working as expected.
For demonstration purposes, we’ll be using Prosys OPC UA Simulation Server to simulate the underlying devices and servers. How this is done will be demonstrated below.
Request download for Prosys OPC UA Historian here
Request download for Prosys OPC UA Simulation server here
Once both software is installed, we launch them up and end up being greeted by these two windows

Once the demo time on Historian has expired, it can be renewed by stopping the server, and pressing start again.
Adding source servers on Historian is simple:
Select the Source Servers tab on the Historian window
Click Add New Server
Copy the UA TCP address shown on the Simulation Server status tab and paste it as the Connection Address.
Choose a Security Mode. In this case, we’ll go as simple as possible and choose no security.
Choose User Authentication Mode. We’ll go with Anonymous
Press Test Connection to make sure the connection is working properly.
Choose a Server Name. This will be used as the BrowseName for the server in the Historian Address Space.
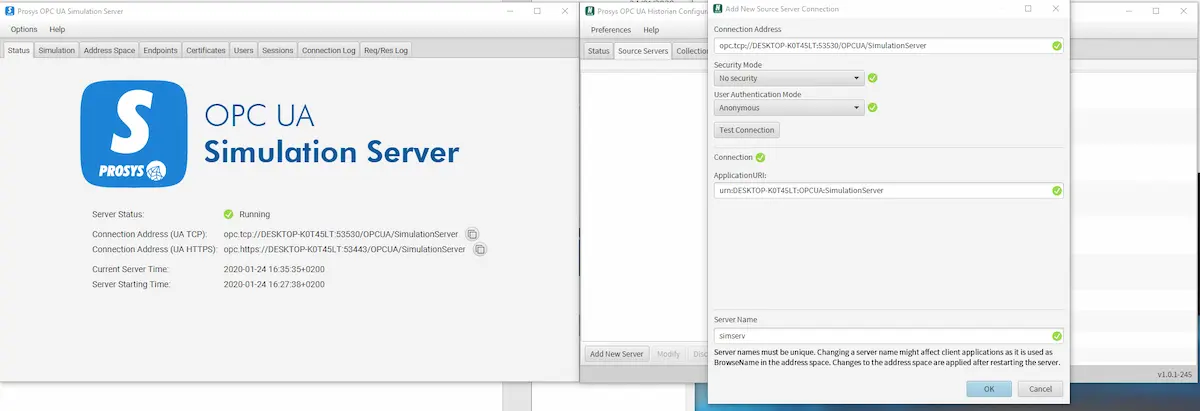
Choose OK.
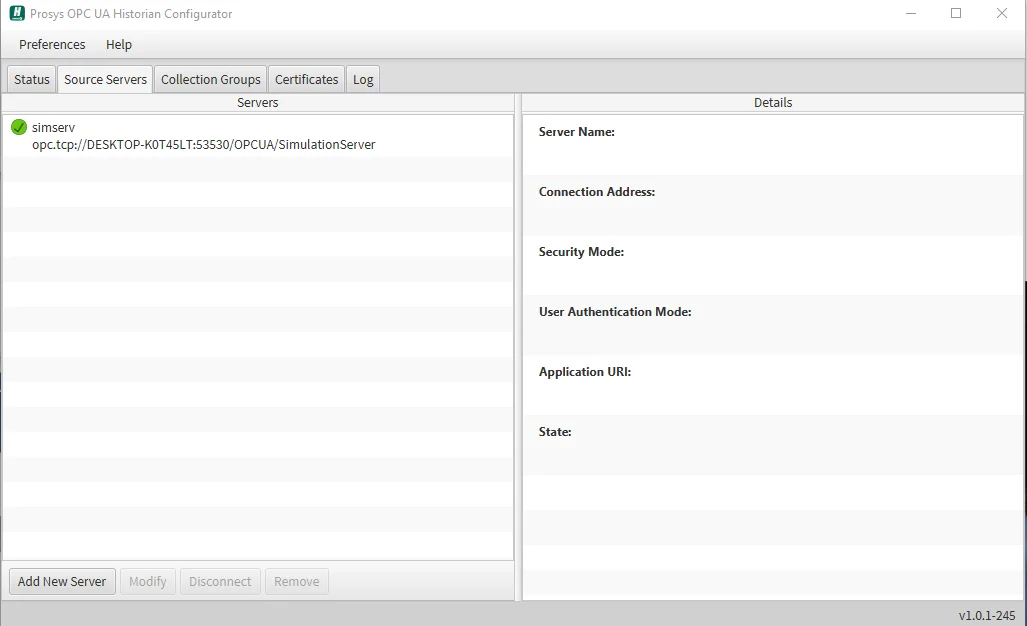
The server should now appear in the Servers pane on the left. The green check-mark indicates that a connection has been established.
By connecting to the Historian endpoint with our OPC UA client of choice (in our case, Prosys OPC UA Client for Android), we can see the address space of the Historian server.
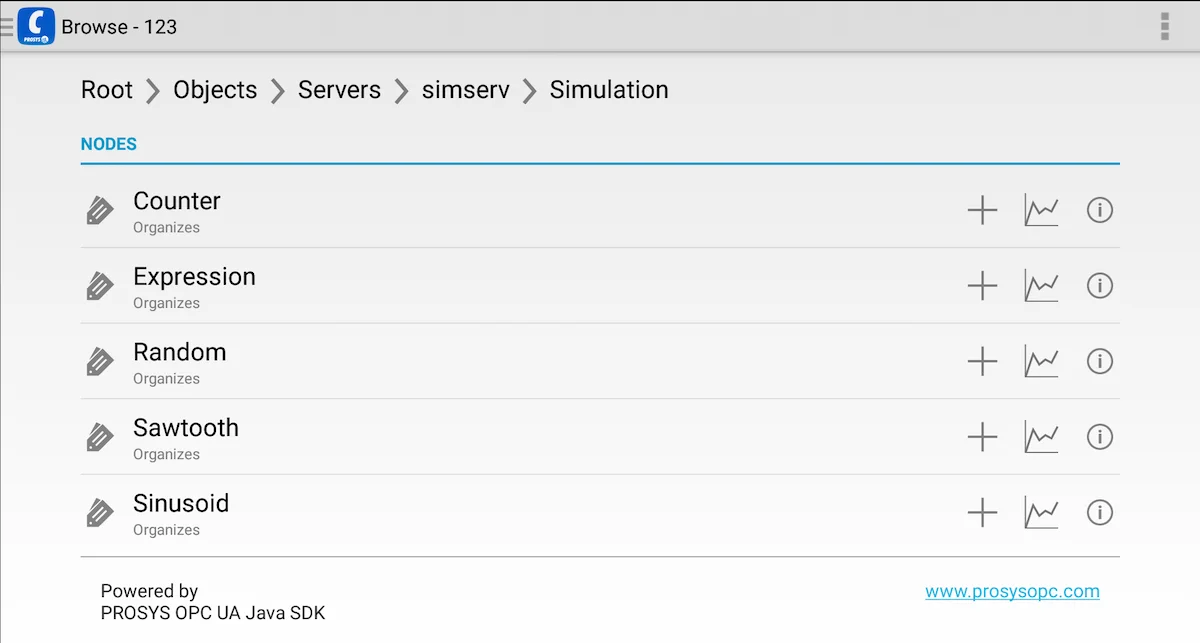
As we can see, a simserv folder node has been created containing the address space of our underlying server, in this case, Simulation Server. The node “Counter” highlighted in the image above (ns=16;s=Counter) is the node whose data we are going to be transferring to AWS.
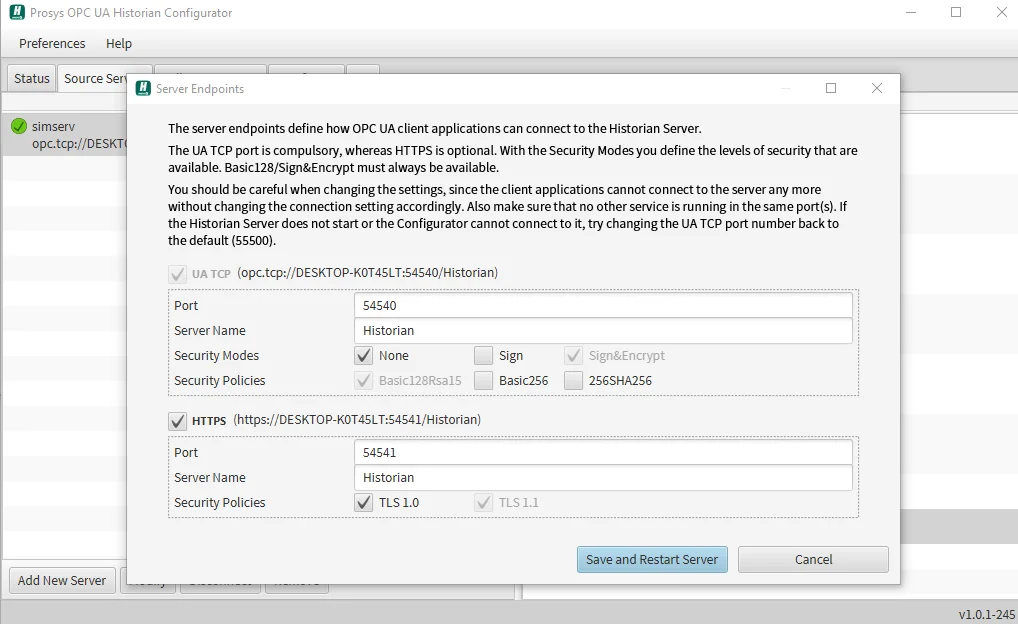
If we wish, Historian allows us to configure the endpoints for either HTTPS or OPC.TCP. This can be done by clicking to Preferences->Server Endpoints. For the purpose of this demonstration, we’ll leave them to their default values.
To start the simulation of values on Simulation Server, go to the Simulation tab and press green start button. A message indicating the state of the simulation is showed next to the stop button.
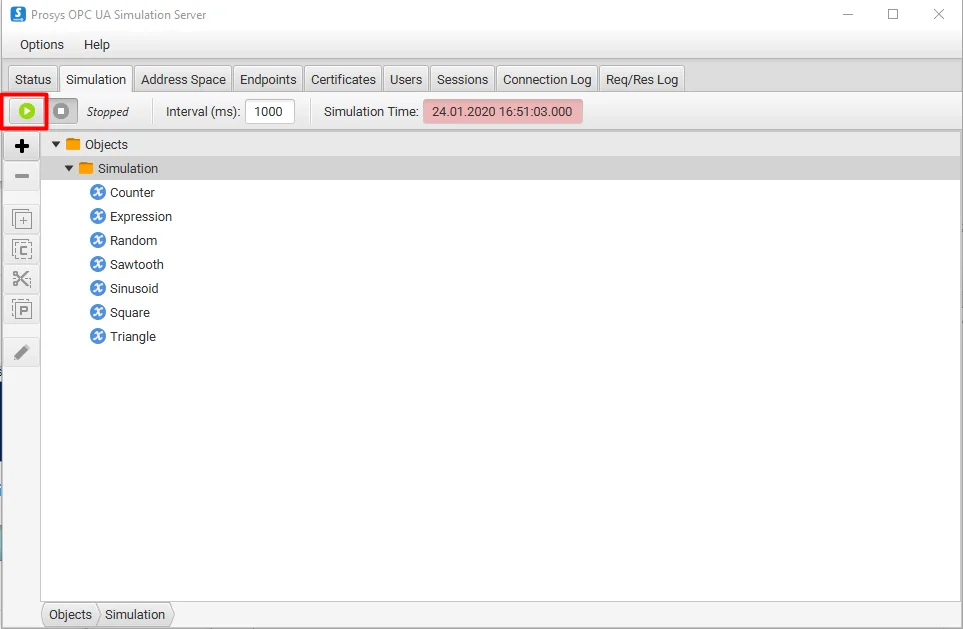
Now that our Simulation server and Historian are up and running, we are ready to start the installation and configuration of the AWS Greengrass.
Setting up the AWS CLI and running the Greengrass docker container
1. Install and configure AWS CLI
Commands below will configure the CLI with the correct access keys that will let us communicate with the cloud. We choose eu-west-1 as the default region since IoT SiteWise is currently available there.
Run the following commands in a command prompt.
					  pip3 install awscli --upgrade --user
  aws configure
  AWS AccessKey ID [None]:[AccessKey ID here]
  AWS SecretAccessKey[None]:[SecretAccessKey here]
  Default region name [None]: eu-west-1
  Default output format [None]: json
2. Getting the Greengrass Docker container image from Amazon ECR
Get the required login command, which contains an authorization token for the AWS IoT Greengrass registry in Amazon ECR. Run the following commands in a command prompt. Make sure the Docker Desktop is running.
aws ecr get-login --registry-ids 216483018798 --no-include-email --region us-west-2
- Copy the output from the previous command, and run it on the command prompt
docker login -u AWS -p [your_token] https://216483018798.dkr.ecr.us-west-2.amazonaws.com
Now that we’ve authenticated to the AWS IoT Greengrass container image with our Docker client, we can retrieve the latest container image with the following command
docker pull 216483018798.dkr.ecr.us-west-2.amazonaws.com/aws-iot-greengrass:latest
3. Configuring AWS IoT Greengrass on AWS IoT
Follow the instructions on the AWS Developer Guide. Skip the step where we are prompted to download the Greengrass Core Software as we are using the docker container provided earlier for this demonstration.
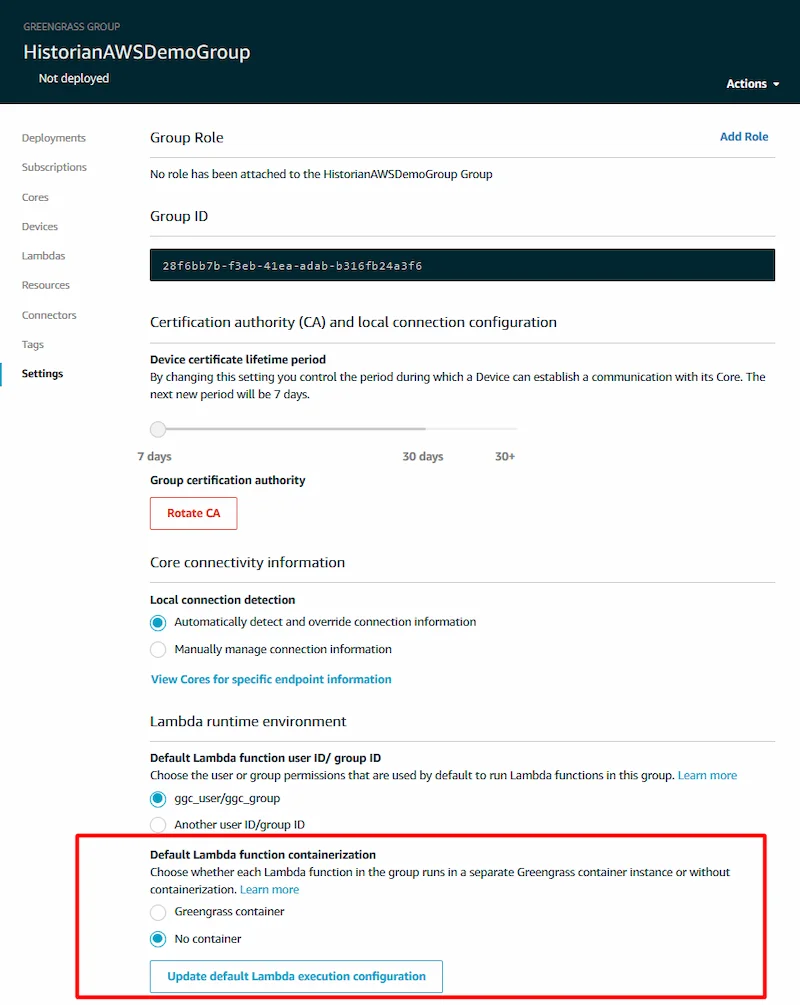
Once the Greengrass group has been set up, we’ll need to set up the default containerization for this group to “No container” in order to properly run lambda functions inside the docker container.
In the AWS IoT console, choose Greengrass, and then choose Groups.
Choose the group whose settings need to be changed.
Choose Settings.
Under Lambda runtime environment, choose No container.
Choose Update default Lambda execution configuration. Review the message in the confirmation window, and then choose Continue.
4. Run AWS IoT Greengrass Locally
In the last step, we were prompted to download the security resources in the form of a tar.gz archive.
Locate the file and decompress it using a utility such as 7-Zip into
C:\Users\%USERNAME%\Downloads\
The archive needs to be decompressed twice. When done, a config and a certs folder should appear in the Downloads folder.
Next, we’ll need a CA certificate to enable our device to connect to AWS IoT over TLS. For this demonstration, we’ll be using ATS root CA and download it using curl.
Run the following command in the command prompt
Optionally if there’s no curl, the key can be download by visiting the site and saving the file directly.
					cd C:\Users\%USERNAME%\Downloads\certs
  curl https://www.amazontrust.com/repository/AmazonRootCA1.pem -o root.ca.pem
Before running the container, we are going to change a field on the configuration file.
Open
C:\Users\%USERNAME%\Downloads\config\config.jsonChange the value of the field “useSystemd” from “yes” to “no”
Now the Docker container can be run by bind-mounting the certs and just acquired configuration files.
Run the following command in the command prompt
docker run --rm --init -it --name aws-iot-greengrass --entrypoint /greengrass-entrypoint.sh -v c:/Users/"%USERNAME%"/Downloads/certs:/greengrass/certs -v c:/Users/"%USERNAME%"/Downloads/config:/greengrass/config -p 8883:8883216483018798.dkr.ecr.us-west-2.amazonaws.com/aws-iot-greengrass:latest
Setting up and running the IoT SiteWise Gateway in the docker container
1. Setting up the gateway inside the docker container
First, we will need to run bin/bash inside our docker container. This can be done using the docker exec command.
Open a new command prompt window and run the following command
docker container list
We should see the docker container we have up and running from the previous step.
Copy the CONTAINER ID and use it in the next command
docker exec-it [DOCKERID] bin/bash
If done correctly, an interactive bash prompt should appear.
Using bash, create a symbolic link, as Greengrass Core assumes a java8 directory
ln -s /usr/bin/java /usr/bin/java8
- Using bash, create a /var/sitewise folder and give it the permissions it requires with the following commands:
					mkdir /var/sitewise
chown ggc\_user /var/sitewise
chmod 700/var/sitewise
- Install the following dependencies
					yum install wget
yum install sysvinit-tools
yum install binutils
IMPORTANT!
If the docker container crashes because of a missed step or any misconfiguration, changes in the docker container are lost. For this reason, it is advised to commit the changes using Docker commit. Otherwise, we’ll have to remake the /var/sitewise folder and install the dependencies. After the commit, we’ll create a new image which is run instead of the one shown above.
docker commit [OPTIONS] CONTAINER [REPOSITORY[:TAG]]
2. Creating an IAM Policy and Role
Next, we’ll create an IAM policy and role that allows the gateway to access IoT SiteWise on our behalf.
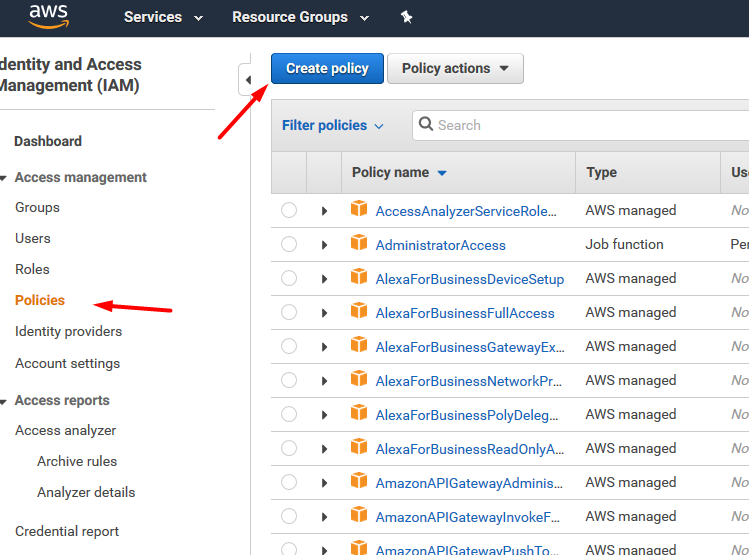
Launch AWS Management console and open IAM
On the navigation pane, select Policies
Select Create Policy
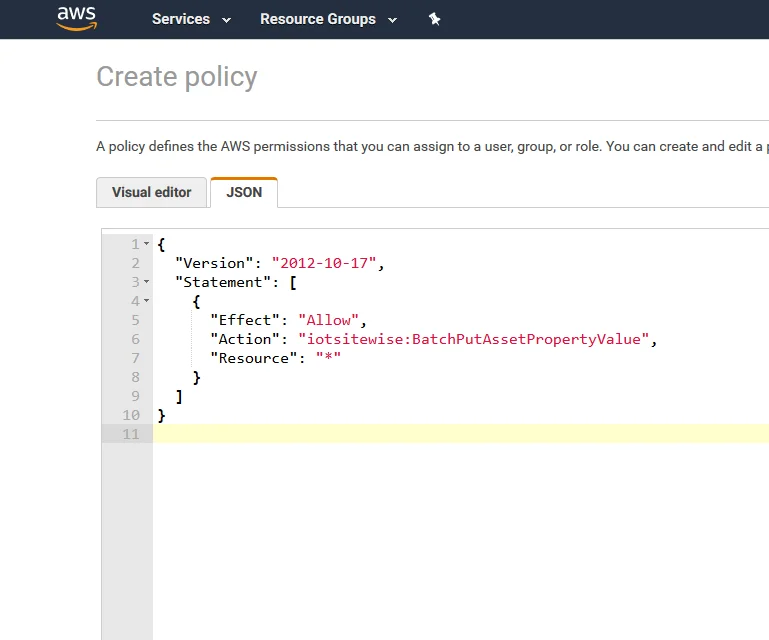
- Choose the JSON – tab and paste in the following policy
Array
Choose Review policy
Enter a name and a description, and then choose Create policy
Now that the policy is ready, we’ll create a role associated with the policy:
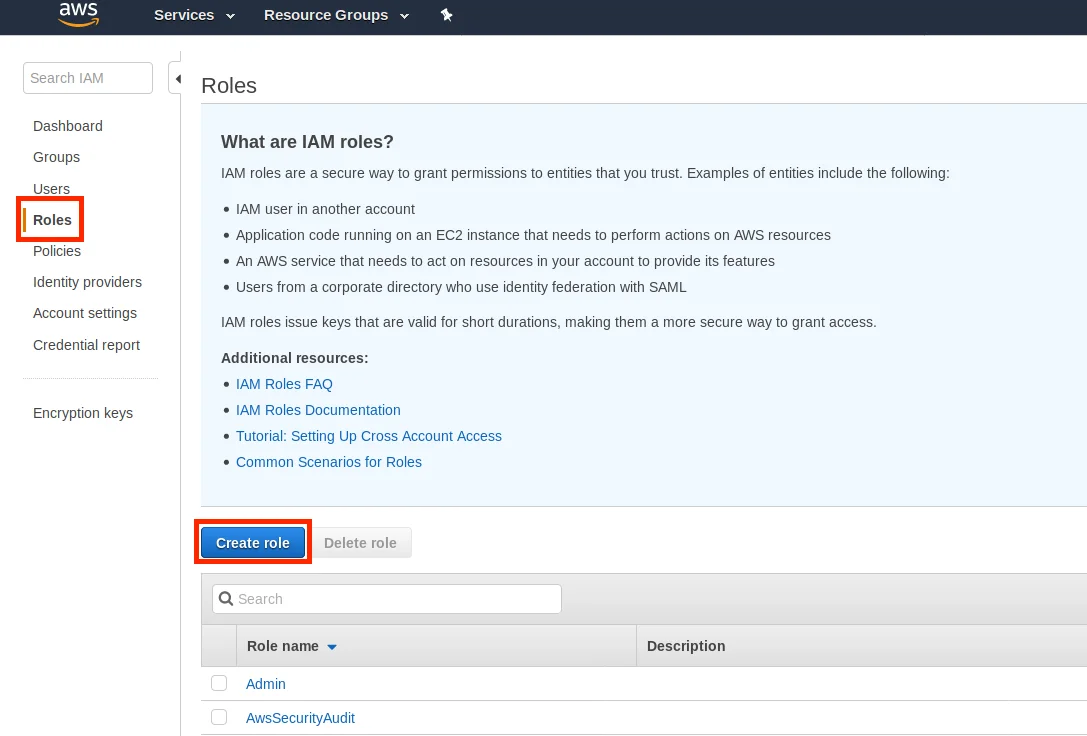
- In the navigation pane, choose Roles , and then choose Create role.
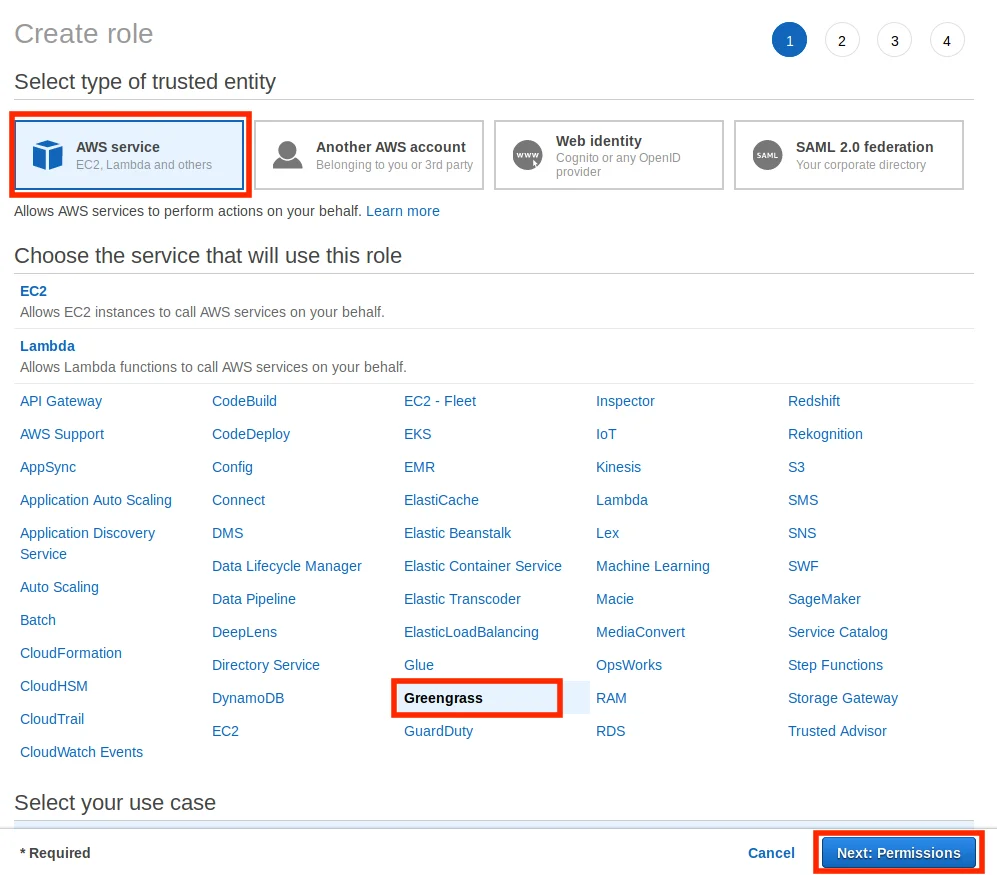
- Under Select type of trusted entity , choose AWS service. Under Choose the service that will use the role , choose Greengrass as the service that will use the role, and then choose Next: Permissions.
Search for the created policy, select the check box, and then choose Next: Tags
Choose Next: Review
Choose Create role
In the green banner, click the link to the new role. The search field can also be used to find the role.

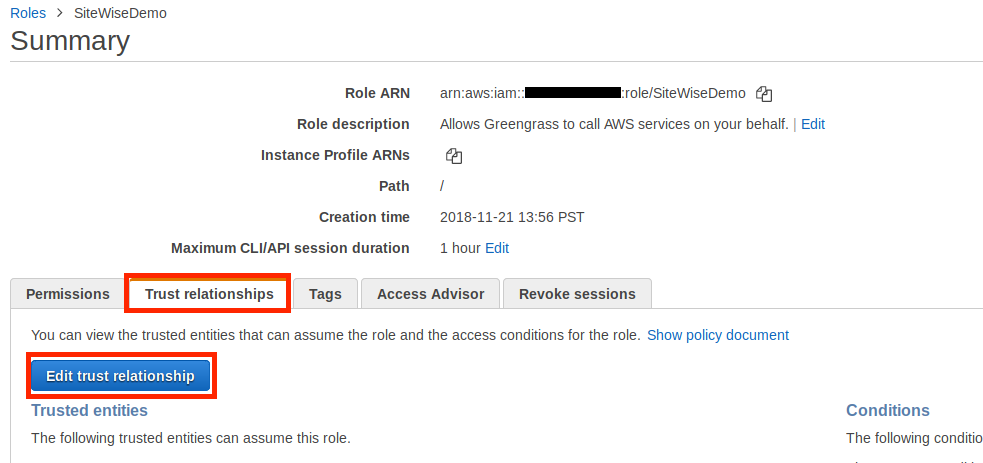
- Replace the current contents of the policy field with the following, and then choose Update Trust Policy.
Array
3. Attaching an IAM ROLE to an AWS IoT Greengrass Group
Navigate to the AWS Management Console, and search for IoT Greengrass.
In the left navigation pane, under Greengrass , choose Groups , and then choose the group that we created in Create an AWS IoT Greengrass Group and Authenticate.
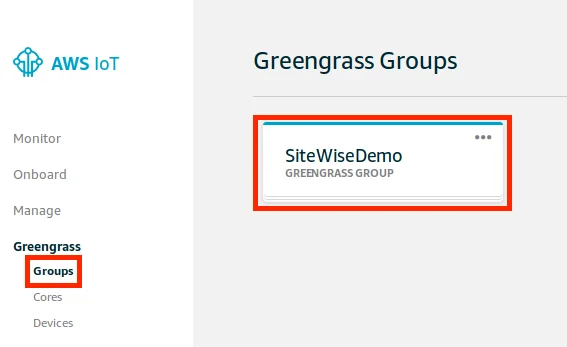
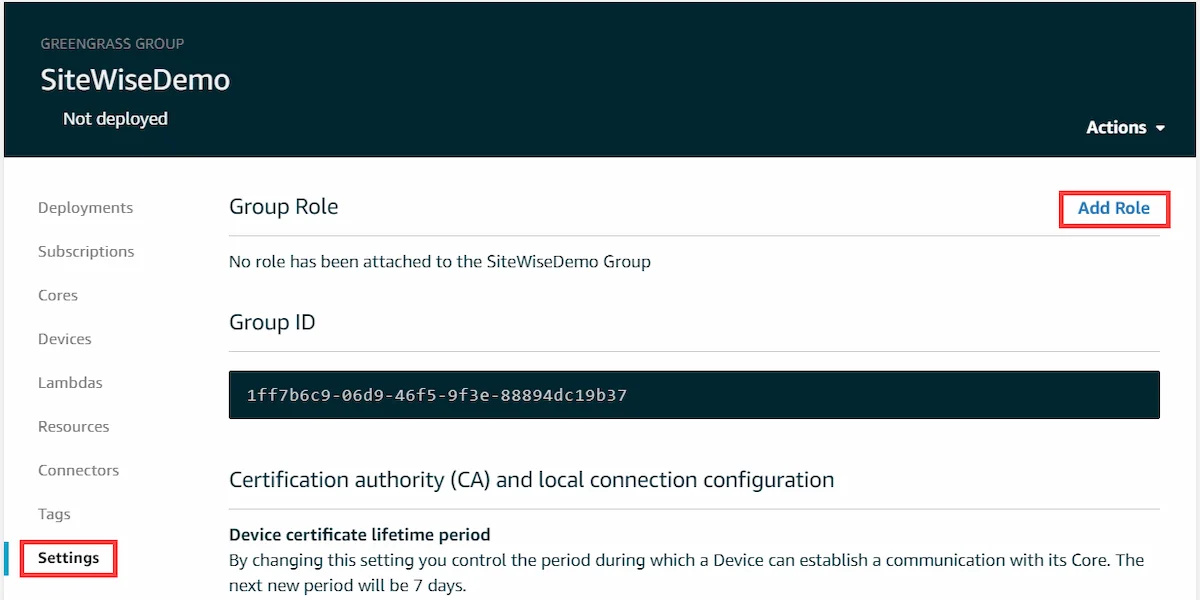
- In the left navigation pane, choose Settings. On the Group Role page, choose Add Role.
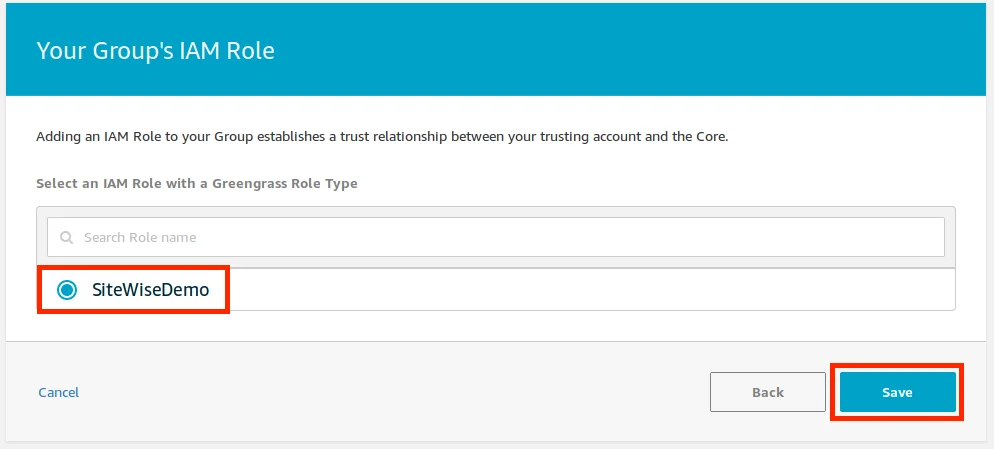
- Choose the role that was created in Create an IAM Policy and Role, and then choose Save.
4. Configuring the AWS IoT SiteWise Connector
In this procedure, we configure the AWS IoT SiteWise connector on the AWS IoT Greengrass group. Connectors are prebuilt modules that accelerate the development lifecycle for common edge scenarios. For more information, see AWS IoT Greengrass Connectors in the AWS IoT Greengrass Developer Guide.
To configure the AWS IoT SiteWise connector
Navigate to the AWS Management Console, and search for IoT Greengrass.
In the left navigation pane, under Greengrass , choose Groups , and then choose the group that’s been created in Create an AWS IoT Greengrass Group and Authenticate.

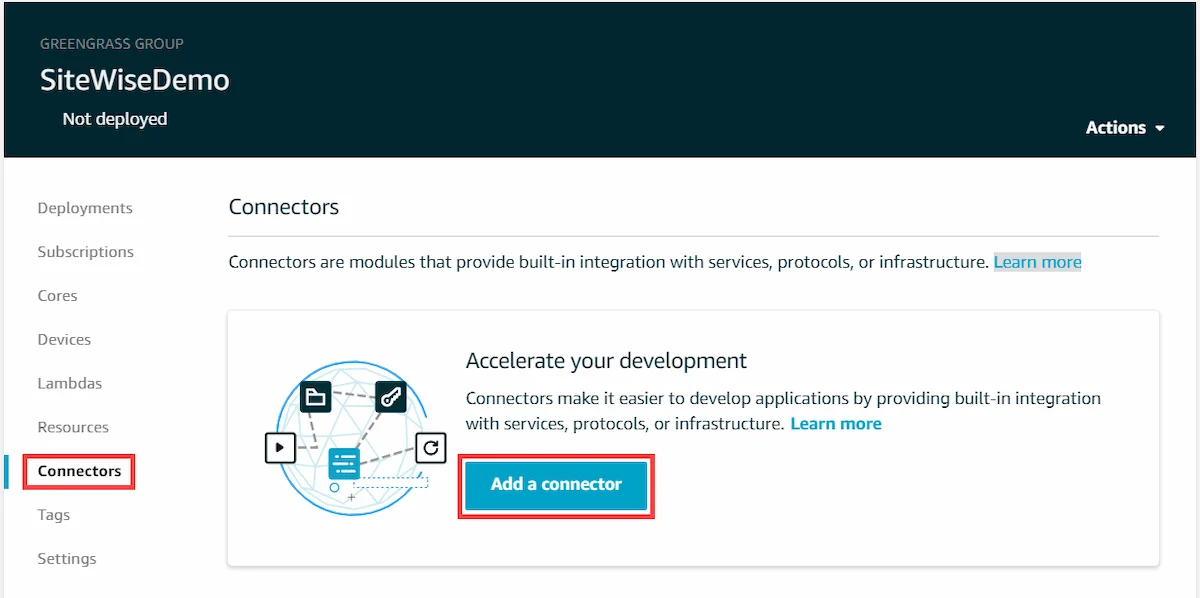
- In the left navigation page, choose Connectors. On the Connectors page, choose Add a connector.
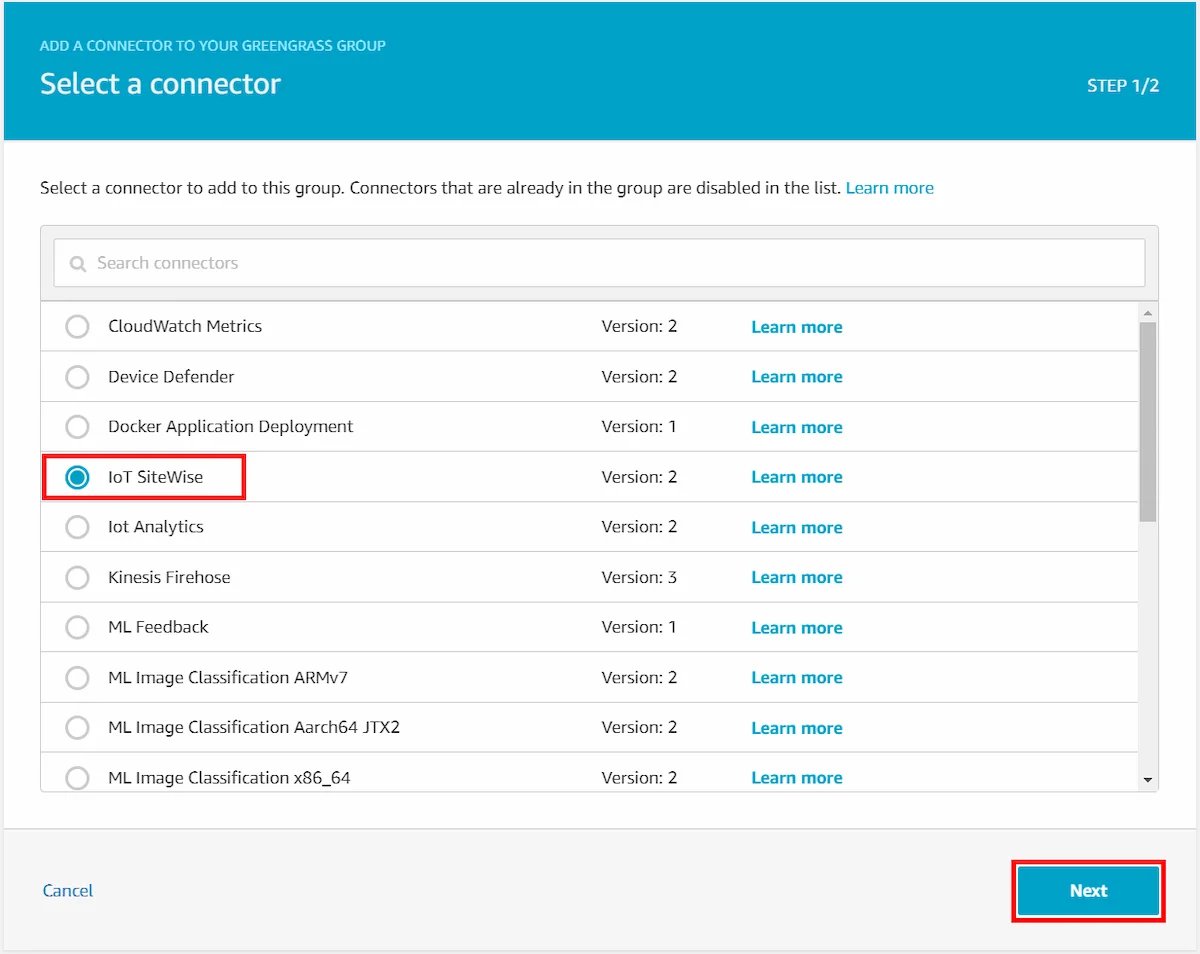
- Choose IoT SiteWise from the list and choose Next.
- In this guide, we won’t be using any security for our setup so we can skip this step. However:
- If OPC-UA servers require authentication, under List of ARNs for OPC-UA username/password secrets , choose Select , and then select each of the secrets. If creating secrets is needed, see Create OPC-UA Server Authentication Secrets.
- Choose Add.
- In the upper-right corner, in the Actions menu, choose Deploy.
- Choose Automatic detection to start the deployment.
If the deployment fails, choose Deploy again. If the deployment continues to fail, see AWS IoT Greengrass Deployment Troubleshooting.
- In the upper-left corner, choose Services to prepare for the next procedure.
5. Adding the Gateway and Configure Sources
We can now add the AWS IoT Greengrass gateway to AWS IoT SiteWise and configure the gateway’s data sources.
NOTE!
AWS IoT SiteWise redeploys the AWS IoT Greengrass group each time we add or edit a source. Gateway won’t ingest data while our group is deploying. The time to deploy the Greengrass group depends on the number of OPC-UA tags on the gateway’s OPC-UA sources. Deployment time can range from a few seconds (for a gateway with few tags) to several minutes (for a gateway with many tags).
Navigate to the AWS Management Console, and search for IoT SiteWise.
Choose Add gateway , enter a name and choose the group that have been created. Then choose Add Gateway. Wait for the gateway to be deployed.
Find the gateway and choose Manage , and then View Details.
Choose New source in the upper-right corner.
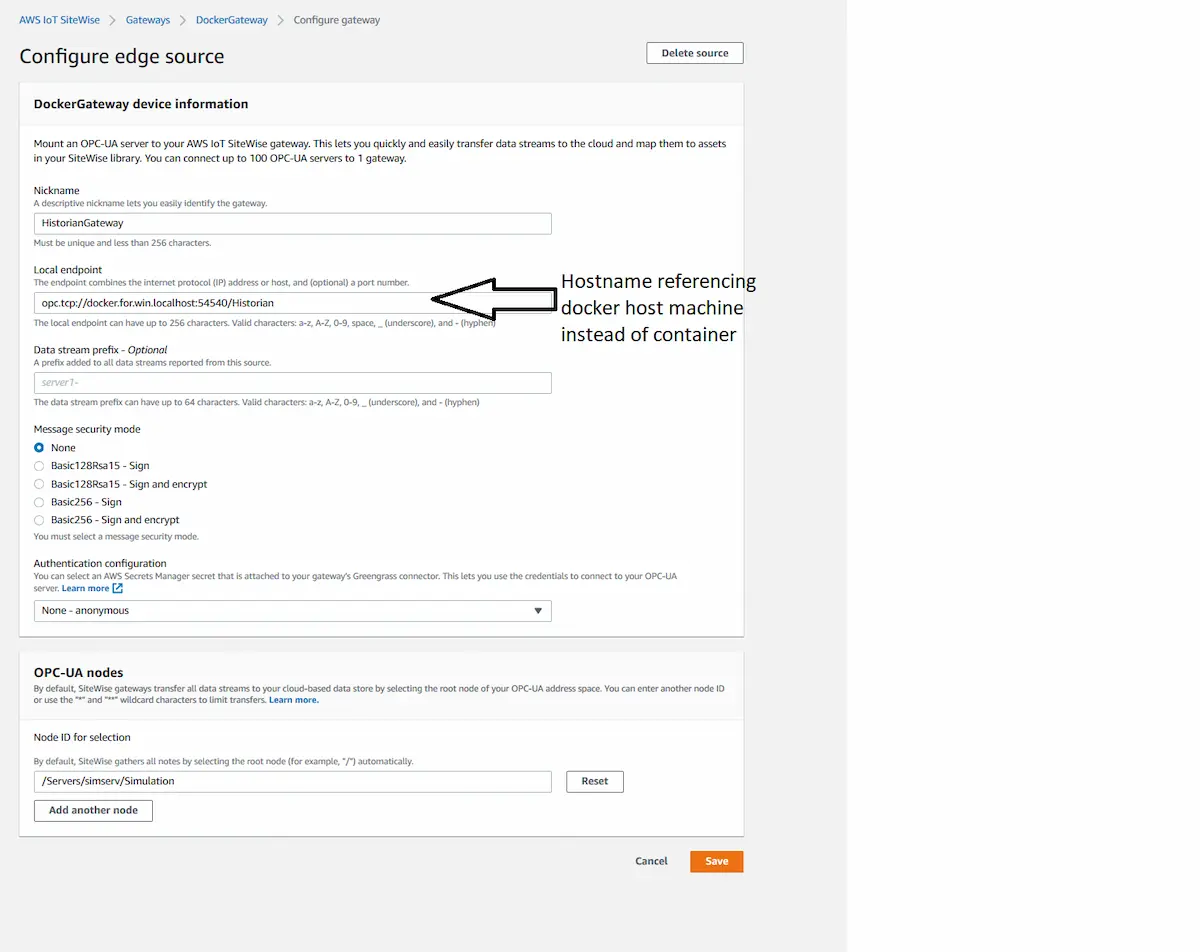
Enter a nickname for the source and enter the local endpoint of the OPC-UA server.
As our gateway is running on a docker container, we need to point the local endpoint to the docker host. On windows, this can be done using docker.for.win.localhost as a hostname.
Choose the message security mode used by the OPC-UA server.
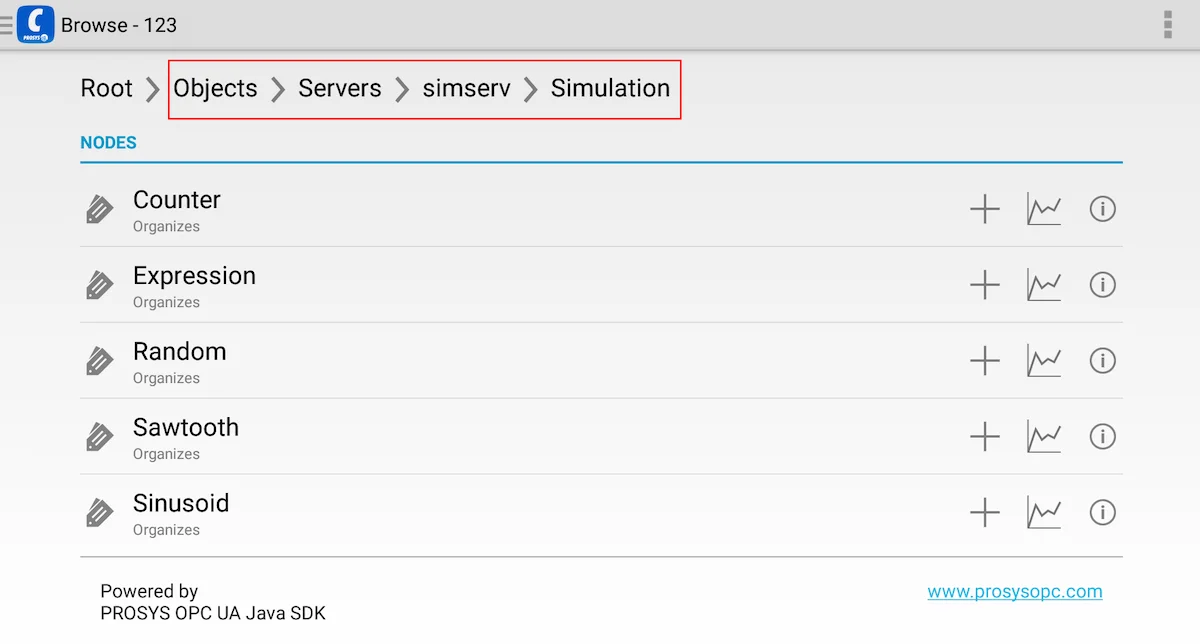
Choose from which nodes we wish to transfer data to the cloud. In our case, we want to process only nodes in the Simulation folder of the Prosys OPC simulation server as shown in the image below
- Choose Save.
6. Add assets and models
Models are used to represent data coming from the devices to the cloud, while assets are instances of models. In this example, we are going to create a model and an asset that will receive the simulated value from the node /Servers/simserv/Simulation/Counter1.
Open IoT SiteWise and choose Models on the side pane
Choose Create model
Give it a name of personal choosing
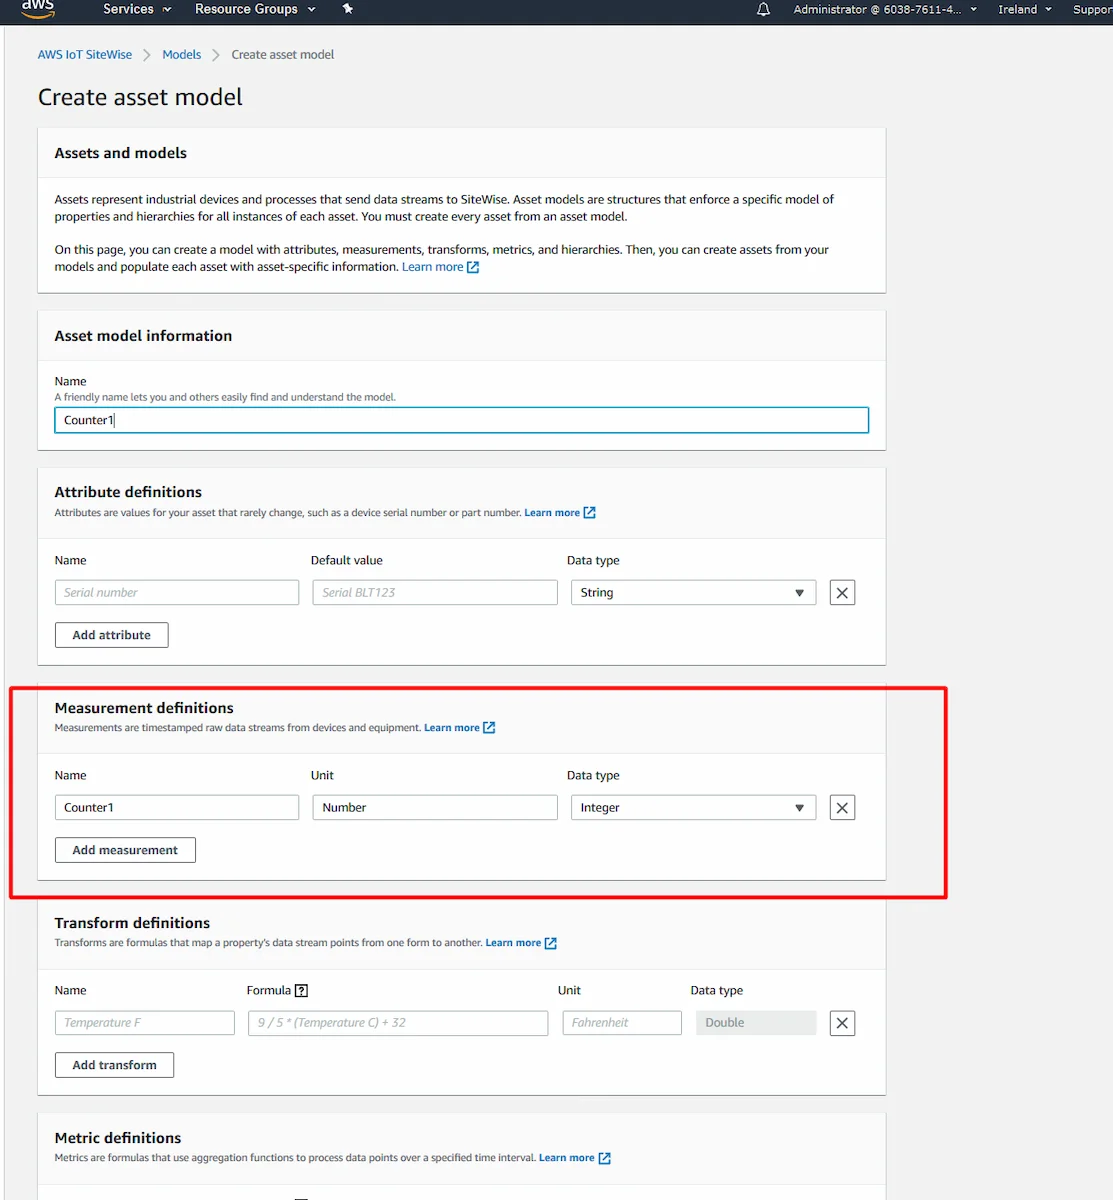
For our purpose, we only need one measurement definition. Give it an arbitrary name, unit, and select the DataType matching the underlying node. In our case, it’s an integer.
Choose Create model
Go to the side pane and choose Assets
Choose Create Asset
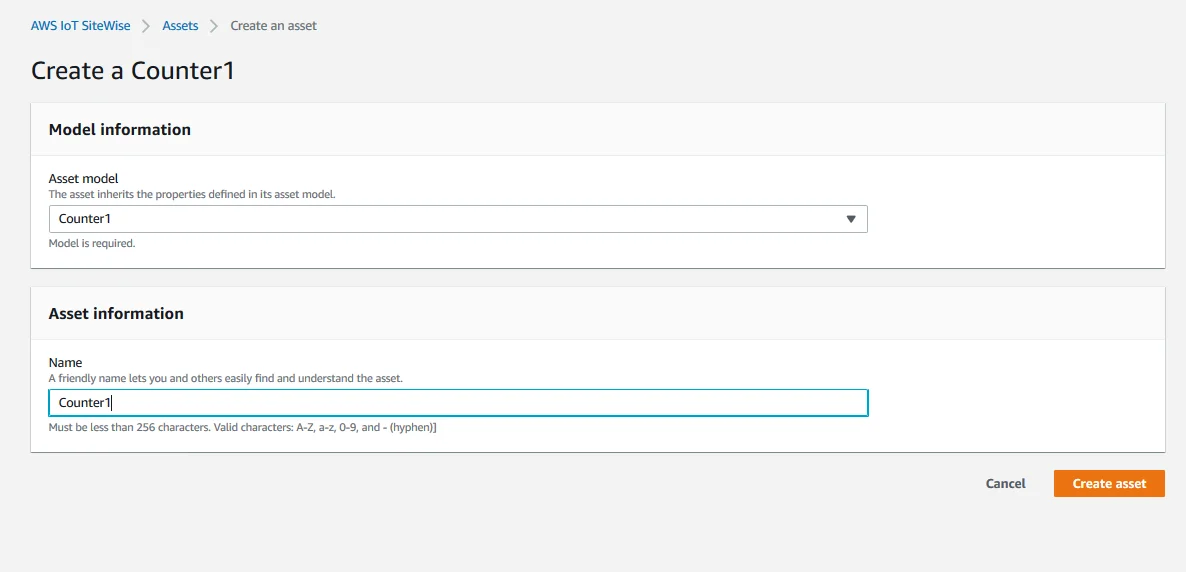
Select just created model and choose a name. Then choose Create asset.
- Choose Edit on the asset for the one that’s just been created
In the measurement section, give the asset a property alias. In our case, the path is: /Servers/simserv/Simulation/Counter1
NOTE!
Make sure the correct path to the node is used when specifying the Asset property alias, as this will be used to map the node values to the asset property. This might be different depending on the version of the Simulation Server or if any other source server for Historian is used.
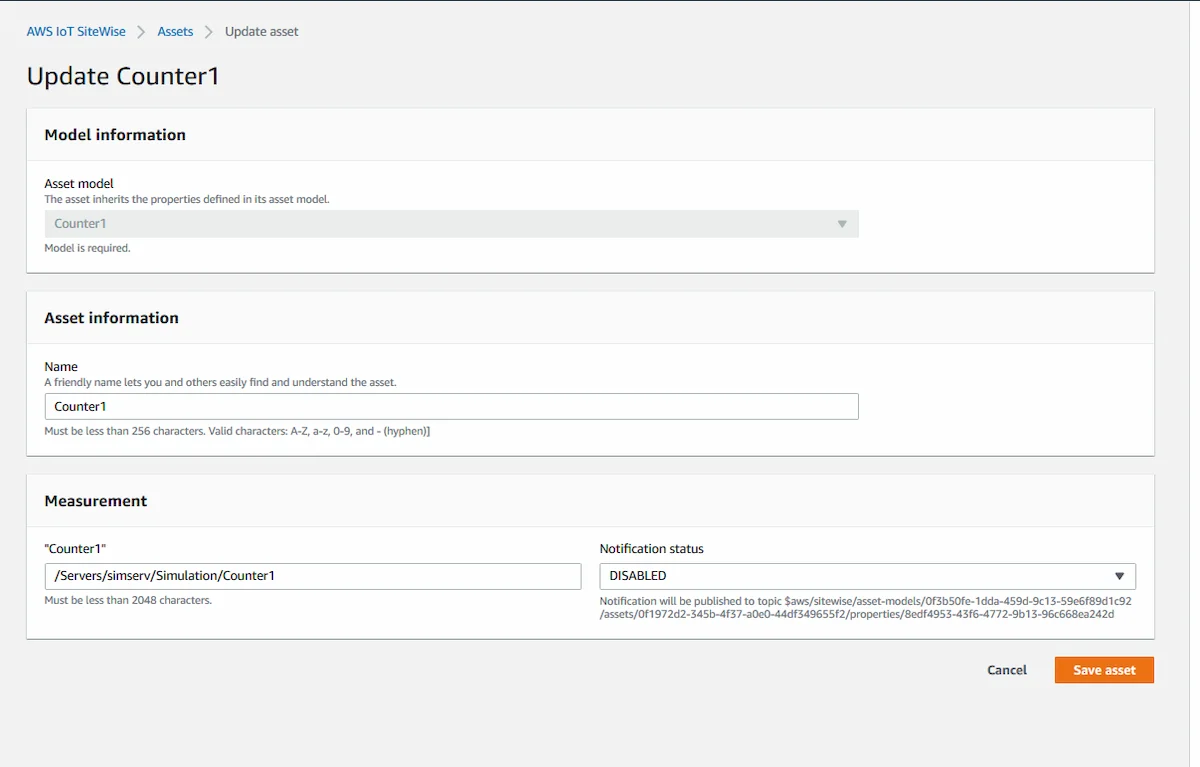
- Choose Save asset
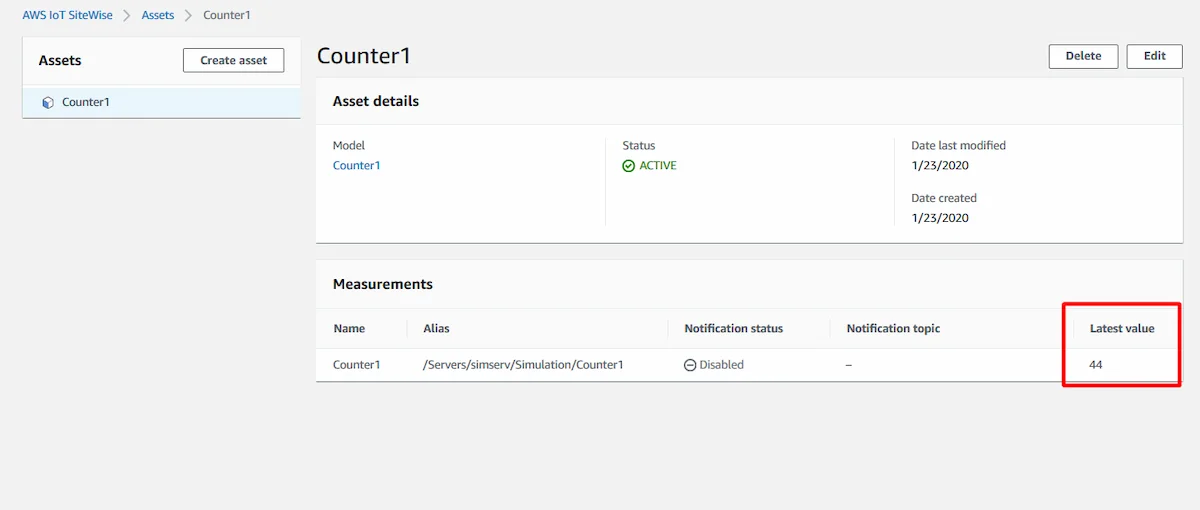
If everything is working correctly, asset’s latest value updating should be seen in the assets tab as shown in the image below.
Final Notes
AWS IoT SiteWise deploys the gateway configuration to the AWS IoT Greengrass core. There’s no need to trigger a deployment manually. However, during our testing, bugs arose, which caused our asset values to not update. We fixed this by redeploying the gateway, which can be done by editing the gateway settings and saving without making any changes.
At the time of writing this article, IoT SiteWise was still in preview, so changes might occur to the way everything needs to be configured.
Amazon offers a wide range of documentation, which can become a messy experience where bits of information required to complete a task are scattered around multiple articles. However, they provide a more in-depth look and more information in general, so checking those out is highly encouraged if this guide piqued personal interest.
In the next part, we’ll be taking a look at how we can use the data transferred to SiteWise in other AWS Services, such as DynamoDB. Also, we’ll configure our demonstration to use security instead of our current none/none configuration.
Author Info

Luukas Lusetti
Software Engineer
Email: luukas.lusetti@prosysopc.com
