Connecting Prosys OPC UA Forge to Various MQTT Brokers
Guides
You can find our finished guides below. Click on the tab you are interested in to read the guide for that specific MQTT broker.
- Azure IoT Hub
- Amazon IoT Core
- Eclipse Mosquitto
- HiveMQ
- Azure Event Grid
Forge Publisher – Azure IoT Hub
During this tutorial, we will be using the following products:
- Azure IoT Hub
- Visual Studio Code with Azure IoT Hub extension
Connecting to Azure IoT Hub
- Create a new device in the IoT Hub.
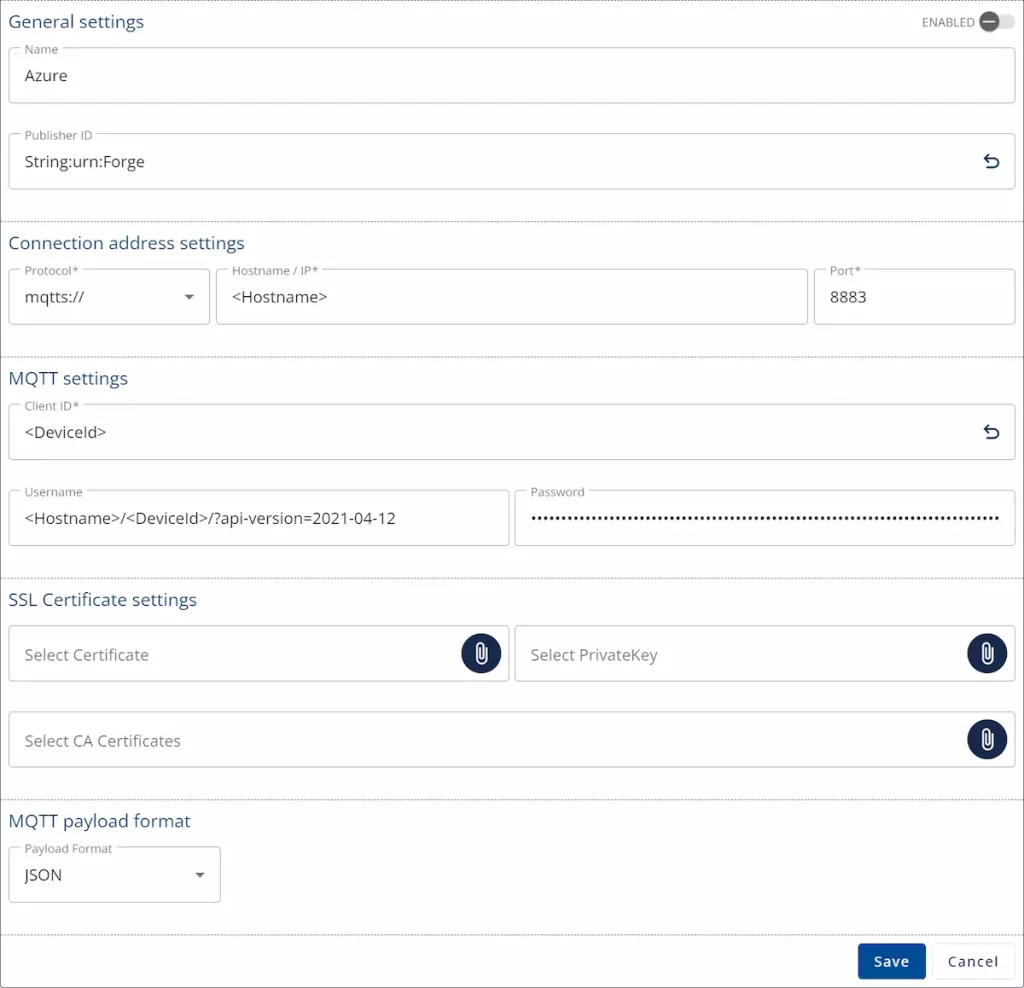
- The connection information to the IoT Hub is as follows:
- Connection address: mqtts://”Hostname”:8883
- Client Id: “DeviceId”
- Username: “Hostname”/”DeviceId”/?api-version=2021-04-12
- Password: “SAS Token”
- Queue: devices/”DeviceId”/messages/events/
- Metadata Queue: devices/”DeviceId”/messages/events/metadata/
- The hostname is the name of your IoT Hub, and it can be seen on the front page of the IoT Hub.
- DeviceId is the name of the device you created.
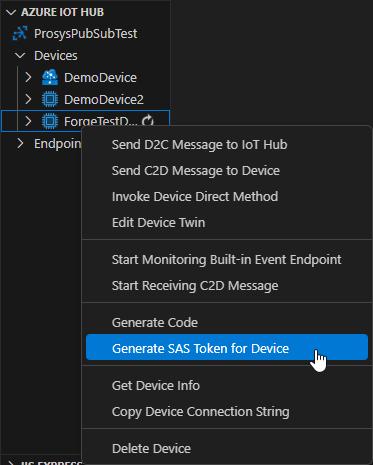
- Generate the SAS Token with Visual Studio Code.
- Open Prosys OPC UA Forge and add the OPC UA Publisher Module.
- In the OPC UA Publisher -tab, you will need to add at least a Connection, Writer Group, and either Variable or Event Data Set.
- Add a Connection to Azure using the connection information you previously collected.
- Create a Writer Group and choose a Variable or Event Data Set that the Writer Group Publishes. Remember to add the correct MQTT Topic Settings to the Writer Group.

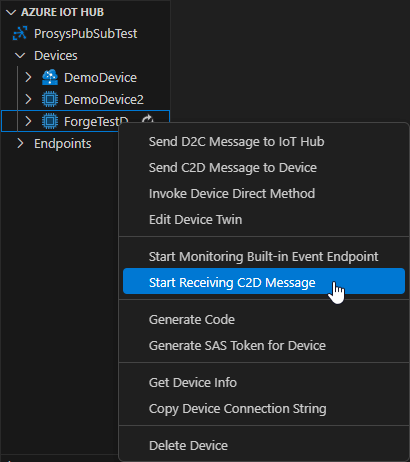
- The Publisher should now be enabled, and the IoT Hub should receive data. You can check the sent messages from Visual Studio Code.
Forge Publisher – Amazon IoT Core – Forge Subscriber
During this tutorial, we will be using the following products:
- Amazon IoT Core
Connecting to Amazon IoT Core
- Create a new single Thing in IoT Core/Manage/All devices/Things/Create Things.
- Enter a name for the Thing and set it to have no shadow.
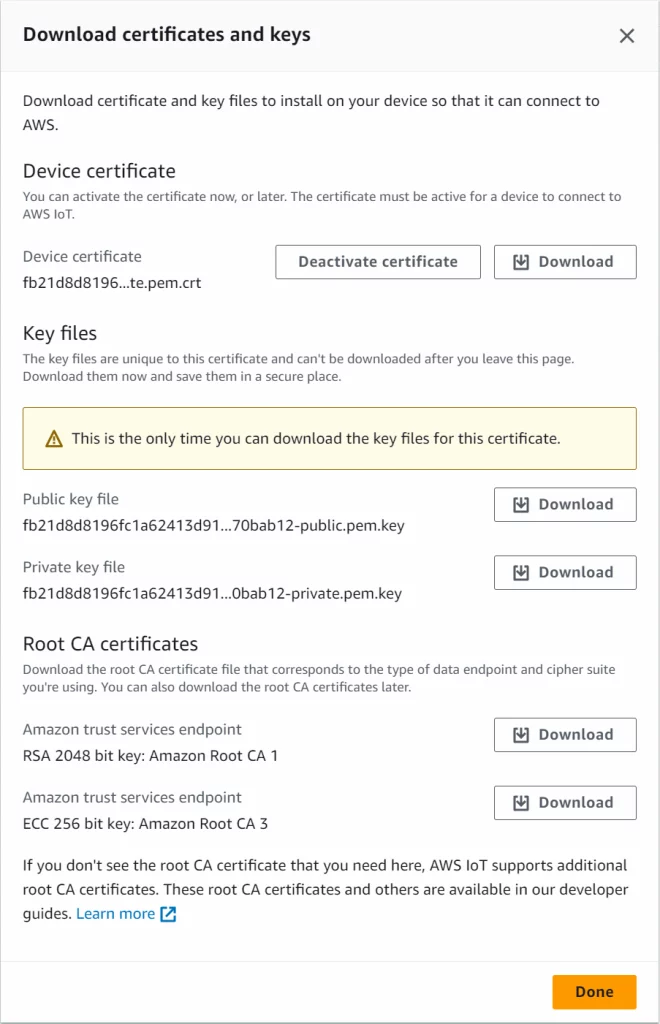
- Auto-generate a new certificate and download all certificate files when prompted.
- Create a new policy, IoT Core/Manage/Security/Policies.
- Give the policy a name and fill in the policy document information as shown in the image below.

- To attach the created policy, go to IoT Core/Manage/Things/”name of the created Thing”/Certificates and choose the certificate you wish to add the policy to.

- You can find the connection Endpoint from IoT Core/Test/MQTT test client/Connection details/Endpoint.
- Open Prosys OPC UA Forge and add the Publisher and Subscriber Modules.
- In the OPC UA Publisher -tab you will need to add at least a Connection, Writer Group, and either Variable or Event Data Set.
- Add a new Connection using the connection Endpoint from IoT Core and the certificates downloaded.
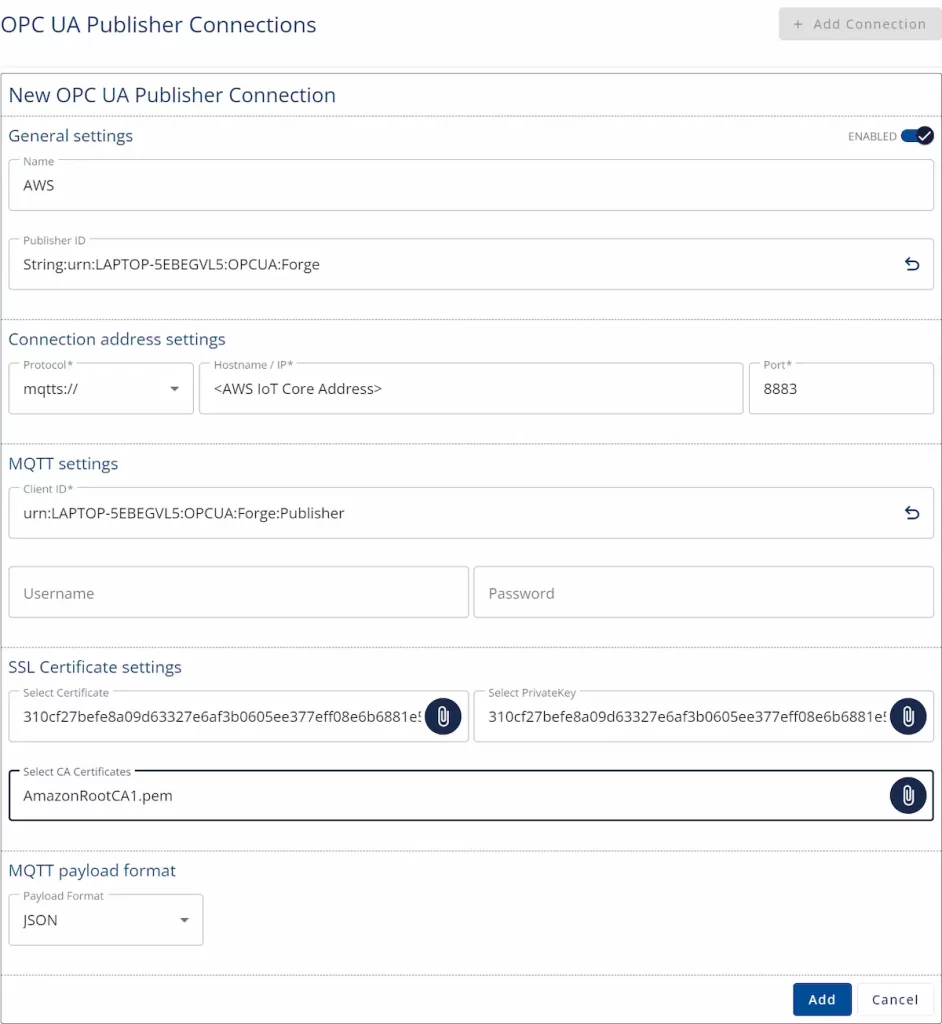
- Create a Writer Group and choose a Variable or Event Data Set that the Writer Group Publishes.
- Now, you should see some data in the IoT Core/Test/MQTT test client.
- Use Subscriber wildcard * for the topic filter.
- Lastly, create an MQTT subscriber. In Forge/Data Sources/OPC UA Subscribers, add a new Subscriber using the same certificate files and Endpoint address as for the publisher.
Forge Publisher – Eclipse Mosquitto – Forge Subscriber
During this tutorial, we will be using the following products:
- Docker Desktop
- Eclipse Mosquitto
Connecting to Eclipse Mosquitto
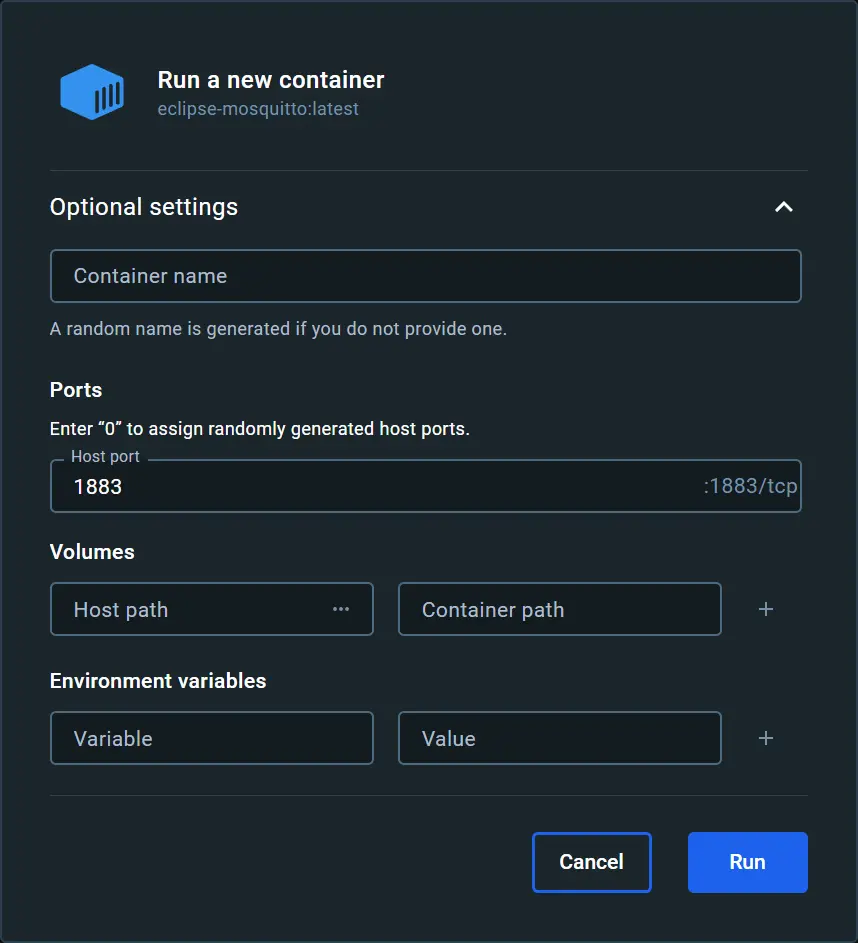
- Pull and run the eclipse-mosquitto image in Docker Desktop.

- Set the correct host port for the MQTT broker. In this case, we use the default port, 1883. Other settings are not necessary.
- Run the Docker container.
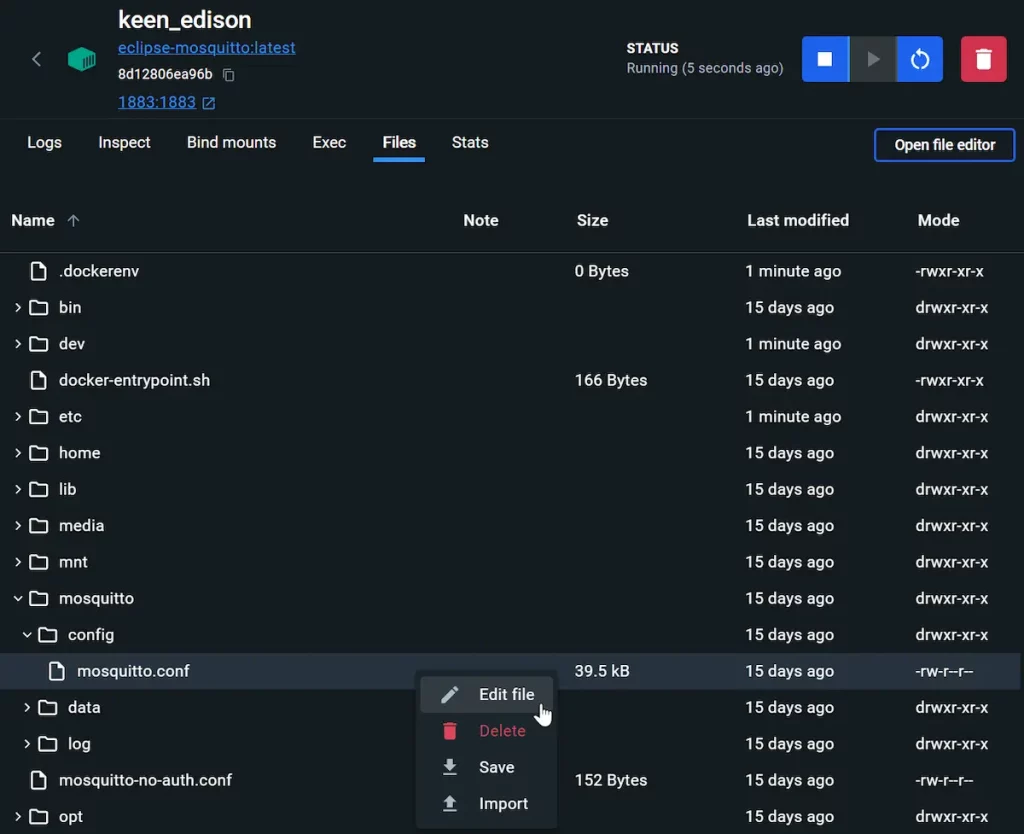
- Open the configuration file from Files/mosquitto/config/mosquitto.conf and edit it with the following information:
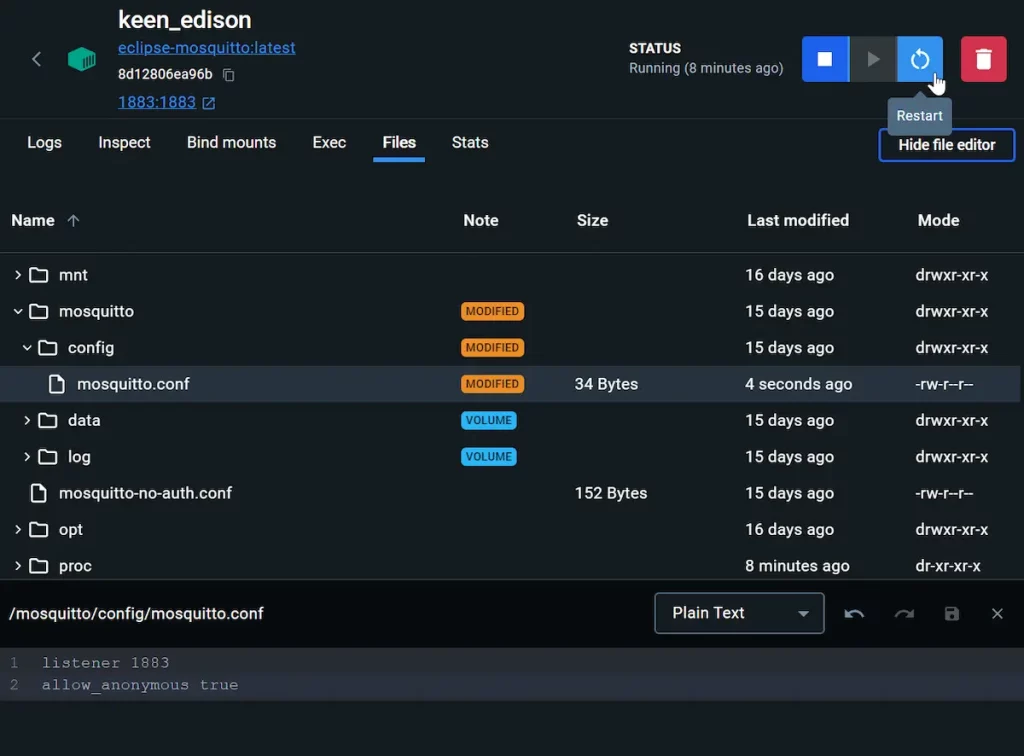
- listener 1883
- allow_anonymous true
These commands allow external connections to port 1883.
- Save and restart the container.
- Open Prosys OPC UA Forge and add the OPC UA Publisher Module.
- In the OPC UA Publisher tab, you will need to add at least a Connection, Writer Group, and either Variable or Event Data Set.
- Add a Connection to the Eclipse Mosquitto using the address mqtt://localhost:1883.
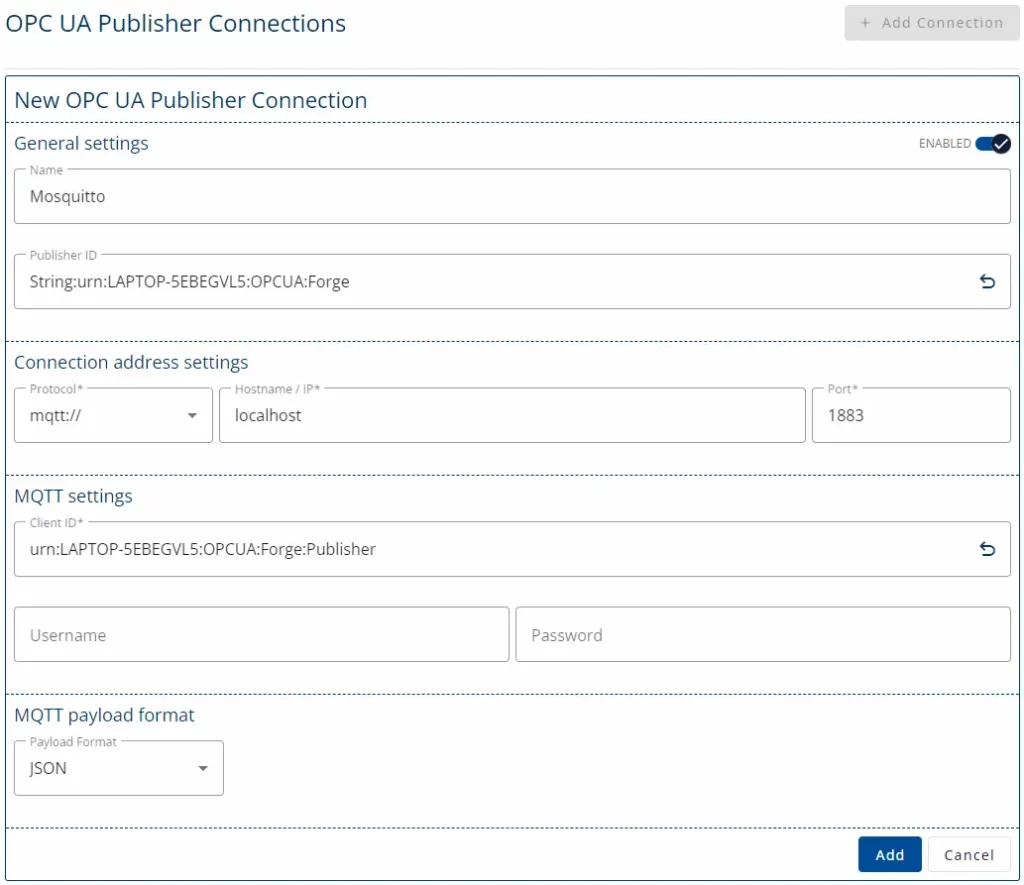
- Create a Writer Group and choose a Variable or Event Data Set that the Writer Group Publishes.
- Now, let’s also add the Publisher.
- Use Subscriber wildcard * for the topic filter.
- Lastly, create an MQTT subscriber. In Forge/Data Sources/OPC UA Subscribers, add a new Subscriber using the same connection address as for the publisher.
Forge Publisher – HiveMQ – Forge Subscriber
During this tutorial, we will be using the following products:- Docker Desktop
- HiveMQ
Connecting to HiveMQ
- Pull and run the hivemq4 image in Docker Desktop.
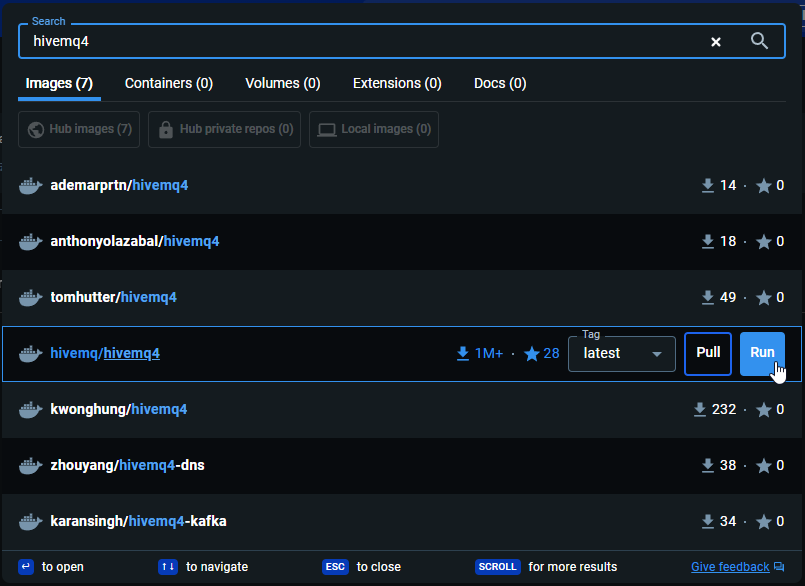
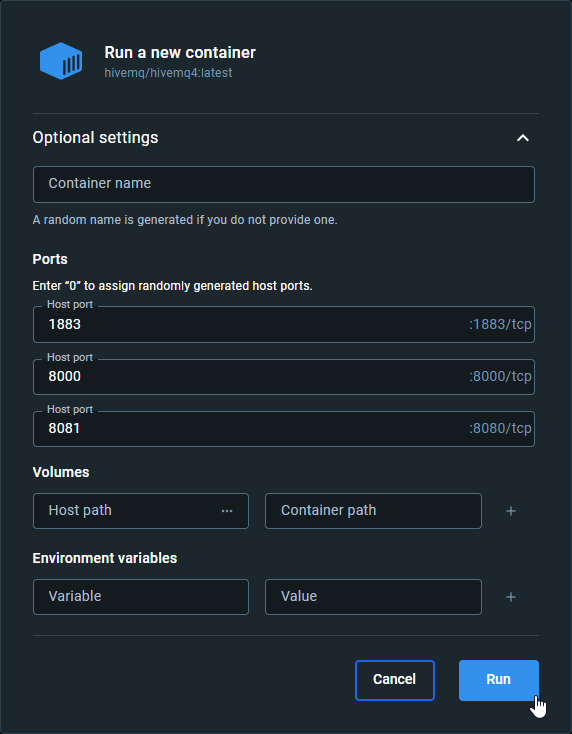
- Set the correct host port for the MQTT broker. In this case, we use the default port, 1883. If you are using the default ports for some other applications, change the ports.
- Run the Docker container.
- Open Prosys OPC UA Forge and add the OPC UA Publisher Module.
- In the OPC UA Publisher tab, you will need to add at least a Connection, Writer Group, and either Variable or Event Data Set.
- Add a Connection to the HiveMQ using the address mqtt://localhost:1883. The connection Name does not matter and to demonstrate that, I am using the same connection from the previous part of this tutorial.

- Create a Writer Group and choose a Variable or Event Data Set that the Writer Group Publishes.
- Now, let’s also add the Publisher.
- Use Subscriber wildcard * for the topic filter.
- Lastly, create an MQTT subscriber. In Forge/Data Sources/OPC UA Subscribers, add a new Subscriber using the same connection address as for the publisher.
Forge Publisher – Azure Event Grid – Forge Subscriber
During this tutorial, we will be using the following products:Generating Certificates with OpenSSL
If you have installed Git to your device, you already have OpenSSL on your computer. On Windows computers, it is normally located in: C:\Program Files\Git\usr\bin\openssl.exe- Open the .exe file
- Generate a Certificate Authority (CA) Certificate and Key with command: openssl req -new -x509 -days -extensions v3_ca -keyout ca.key -out ca.crt
- Generate a client Key for the Publisher with command: openssl genrsa -out client-pub.key 2048
- Generate a Certificate Signing Request (CSR) with command: openssl req -out client-pub.csr -key client-pub.key -new
- Send the CSR to the CA to sign it with command: openssl x509 -req -in client-pub.csr -CA ca.crt -CAkey ca.key -CAcreateserial -out client-pub.crt -days <duration>
- Now lets generate another Keypair for the Subscriber. Generate a client Key with command: openssl genrsa -out client-sub.key 2048
- Generate a CSR with command: openssl req -out client-sub.csr -key client-sub.key -new
- Send the CSR to the CA to sign it with command: openssl x509 -req -in client-sub.csr -CA ca.crt -CAkey ca.key -CAcreateserial -out client-sub.crt -days <duration>
Configuring the Azure Event Grid
- Create a new Azure Event Grid Namespace. This may take several minutes.
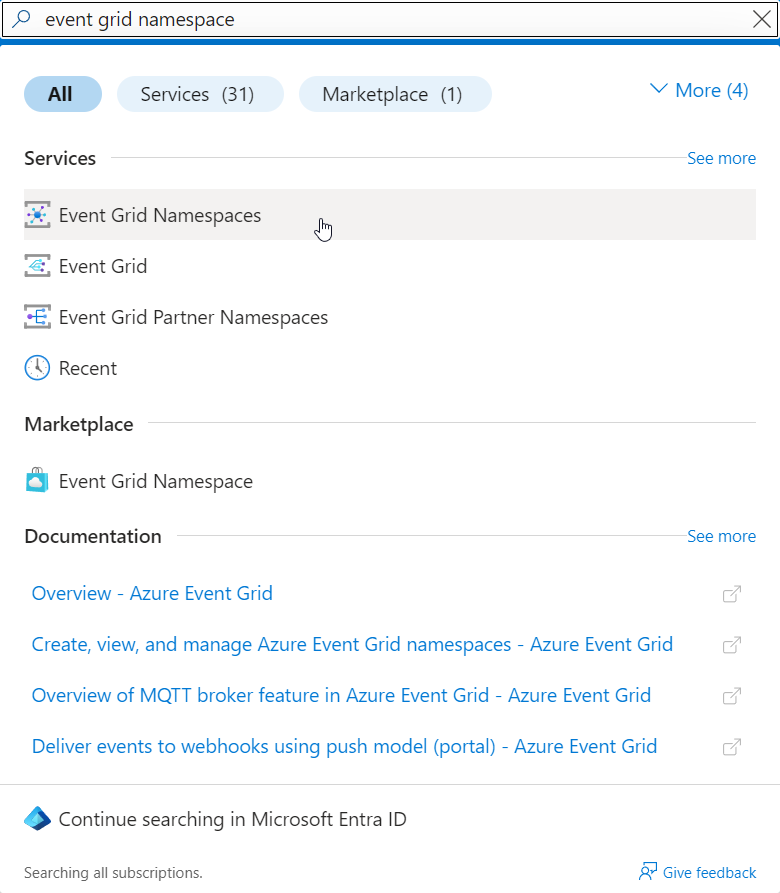
- Enable the MQTT broker that is disabled by default. This may also take several minutes.
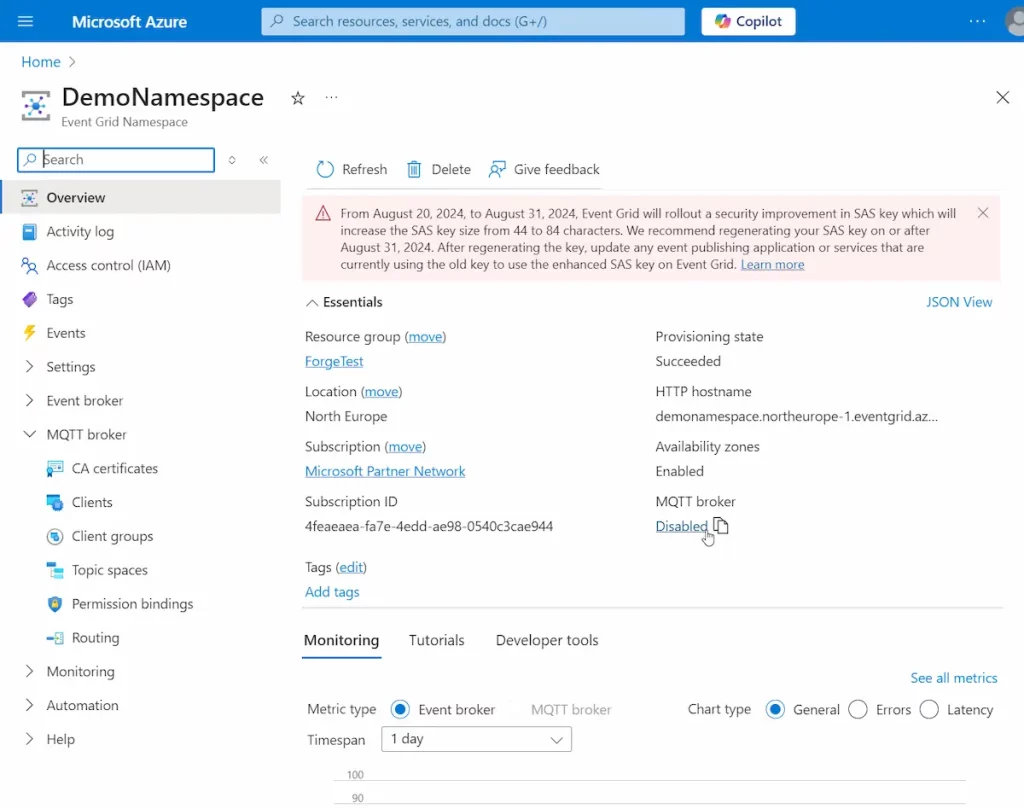
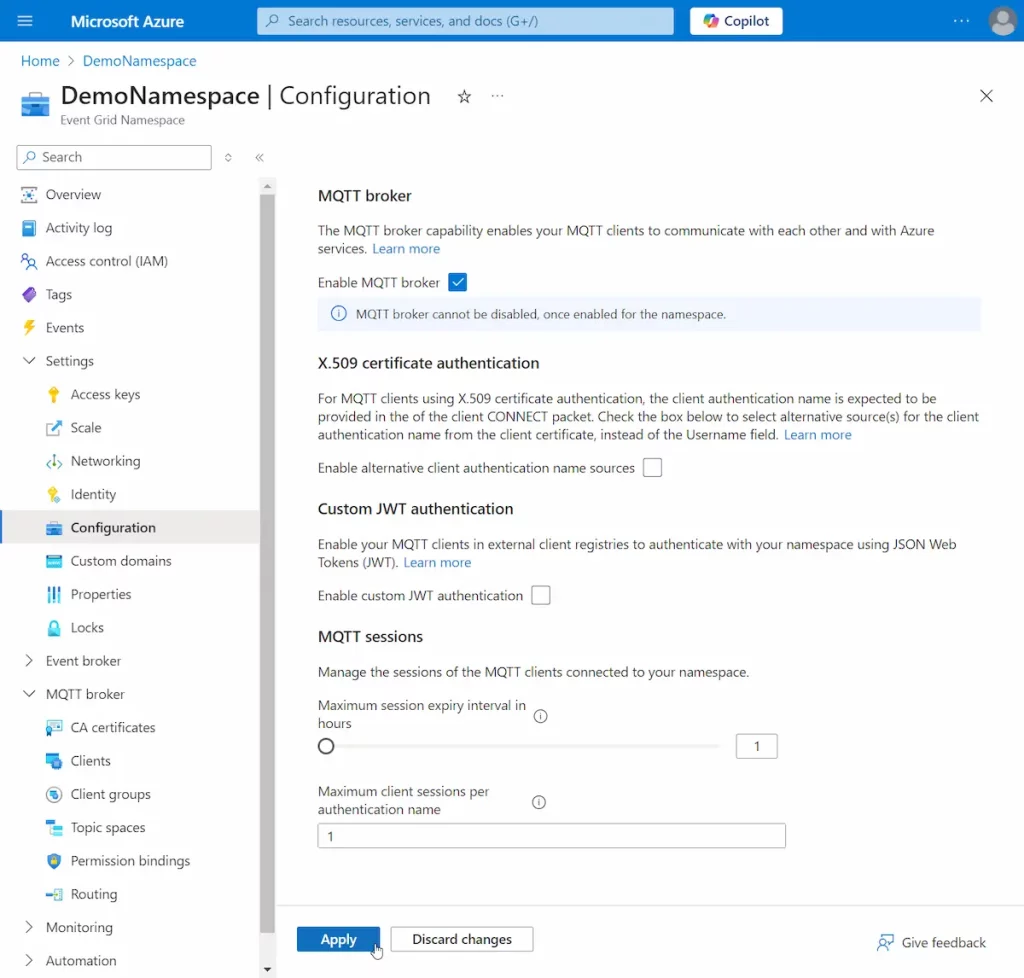
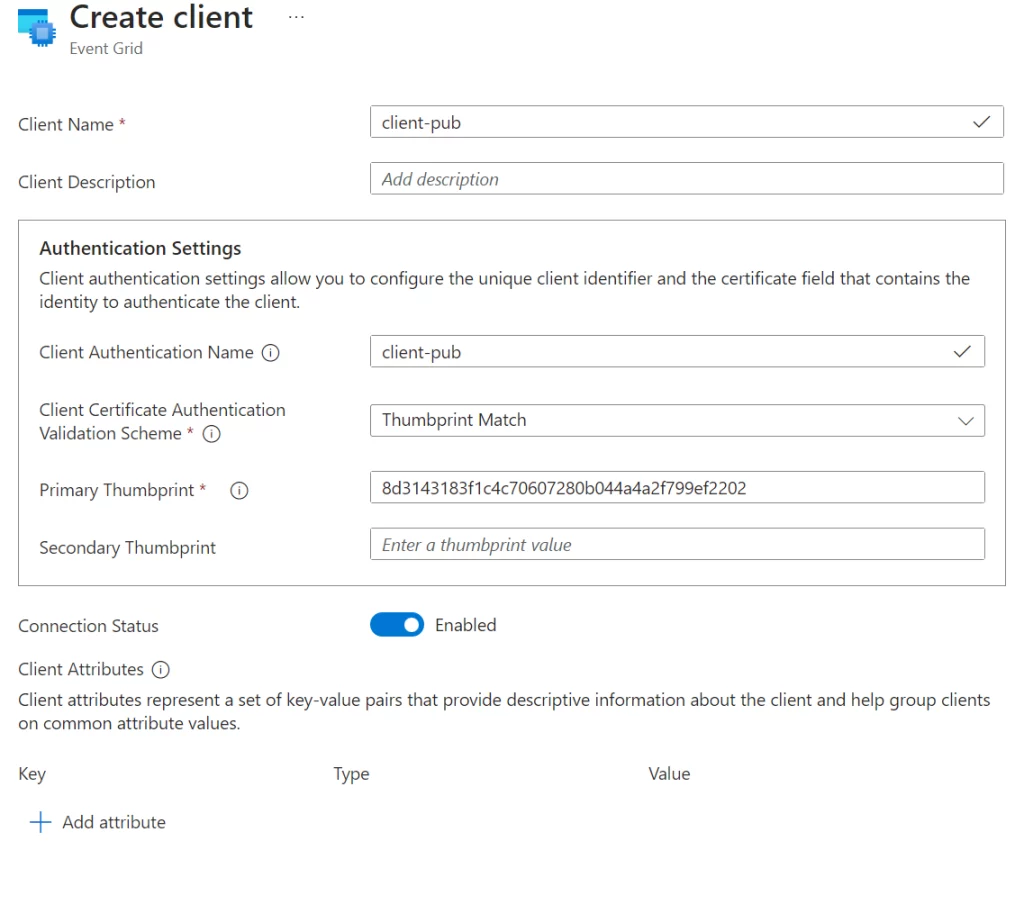
- Next create two new clients, Subscriber and Publisher.
- Select the Thumbprint Match as the Validation Scheme. Then thumbprint can be check from the Certificates we created earlier.
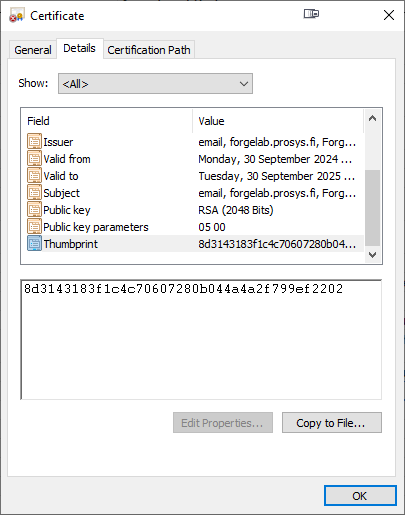
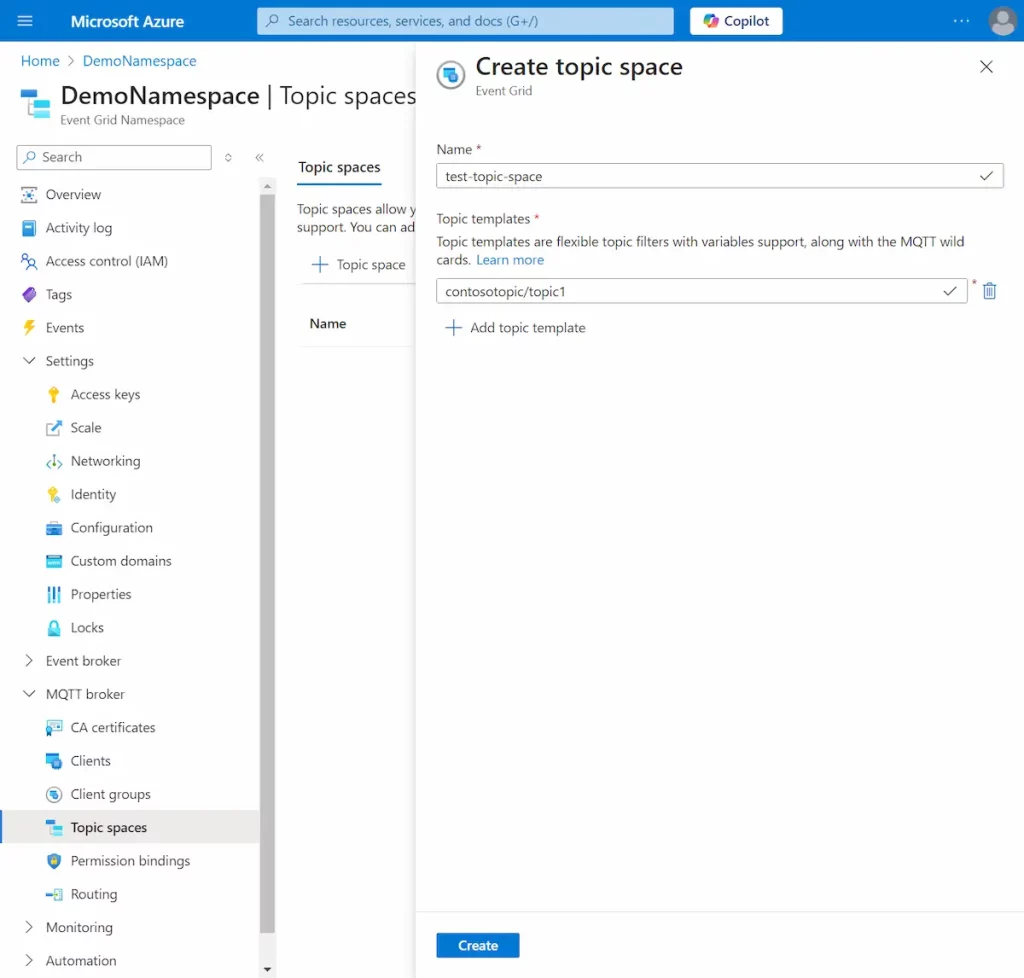
- Create a topic space. You can use any name and template for it. In this demo we are using example template called contosotopic/topic1
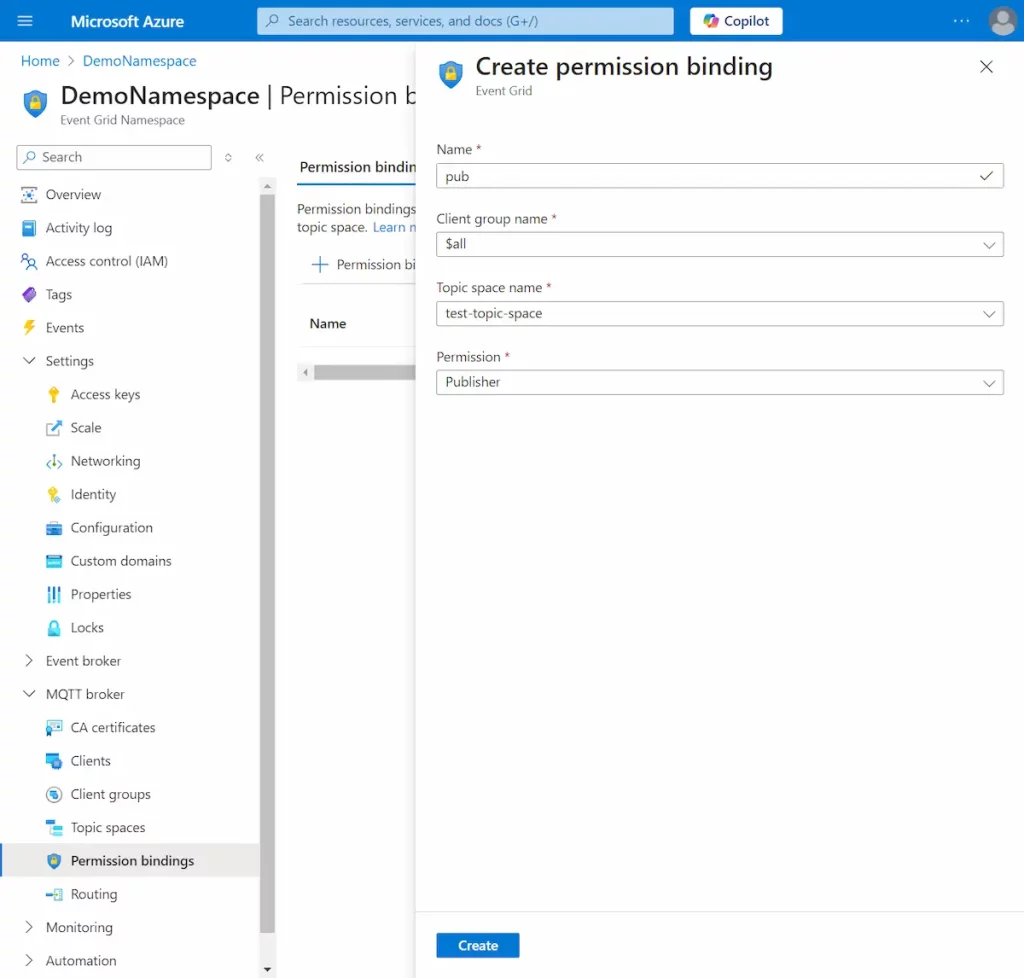
- Create two Permission Bindings. One for the Publisher and one for the Subscriber.
Connecting Forge to the Azure Event Grid
- Open Prosys OPC UA Forge and add the OPC UA Publisher and Subscriber Modules.
- In the OPC UA Publisher tab, you will need to add at least a Connection, Writer Group, and either Variable or Event Data Set.
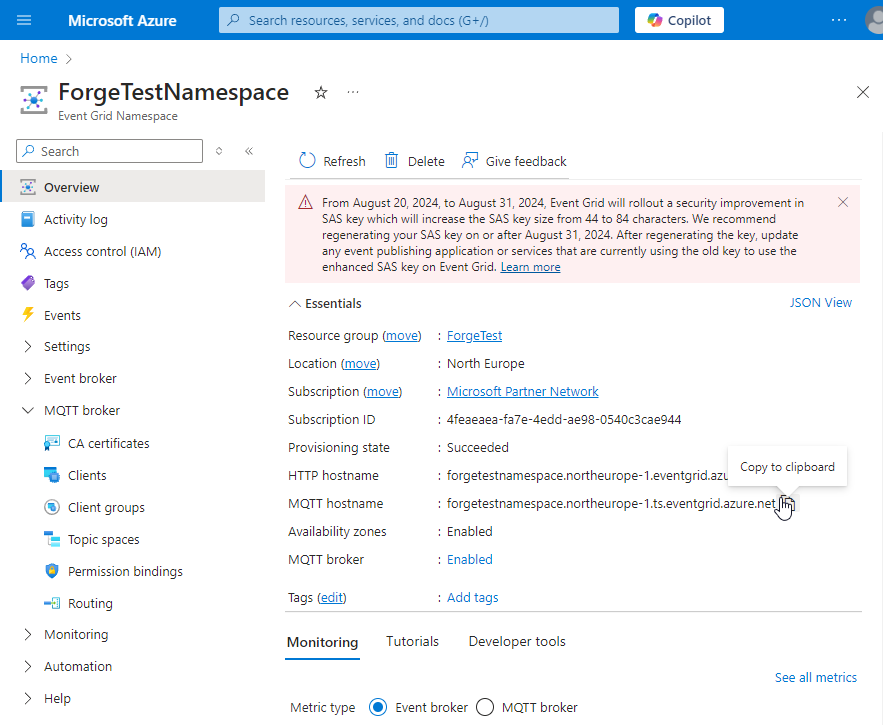
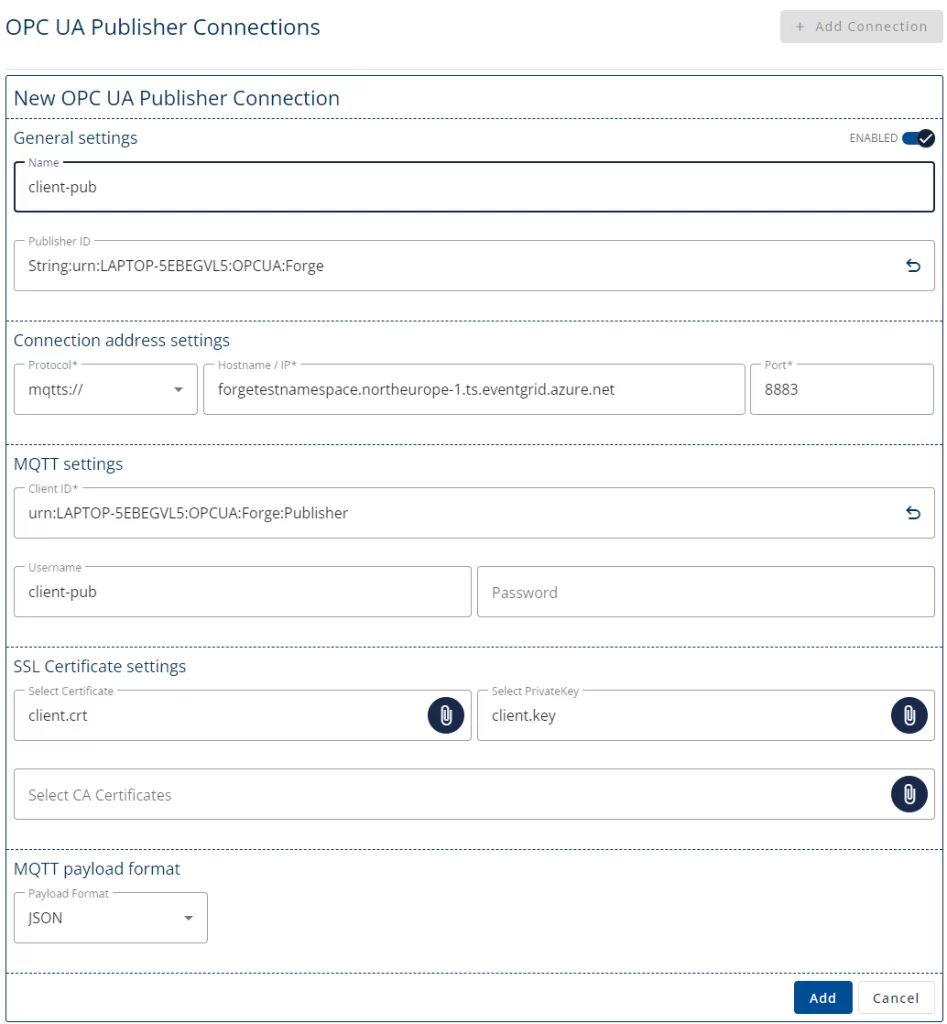
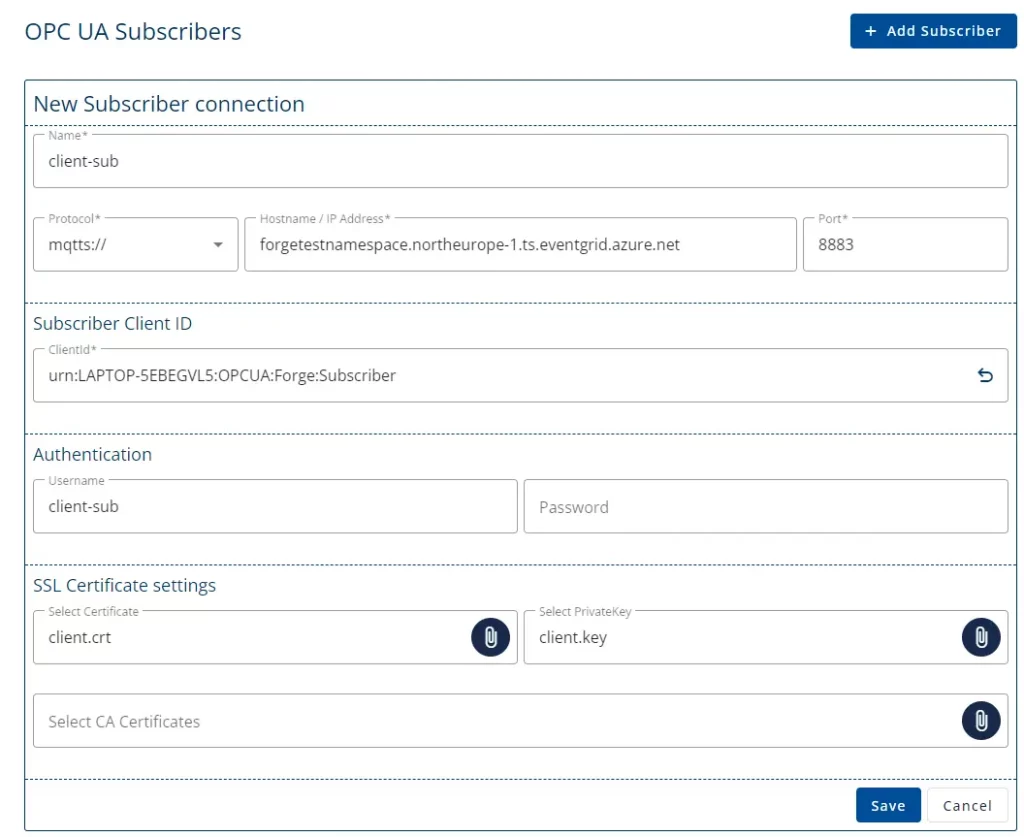
- Add a Connection to the Azure Event Grid using the address mqtts://<MQTT hostname>:8883. Choose the Publisher Certificate and Key that we created earlier. The Username must be the same as the clients name in the Azure Event Grid.
- Lastly, create an MQTT subscriber. In Forge/Data Sources/OPC UA Subscribers, add a new Subscriber using the same connection address as for the publisher. This time use the client-sub Keypair.
Next Steps
To learn more about Forge and its capabilities, request a detailed introduction by emailing sales@prosysopc.com or using our contact form. We’d be delighted to provide tailored information about Forge that aligns with your interests and requirements.
If you want to test Forge yourself, we can provide you with an evaluation license to get you started. You can request an evaluation license by emailing our sales team or filling out the request form.

Iivo Yrjölä
Customer Integration & Support, Prosys OPC
Email: iivo.yrjola@prosysopc.com
