Welcome to the seventh article in our Mastering Forge series!
In the previous article, Mastering Forge #6, we learned how to use Forge’s History Module to store data into an internal database. This provided an OPC UA Historical Access interface where history data could be read directly from nodes.
In this article, we are going to look at Forge’s Data Logger Module, which is part of the Data Storage Suite. You can use the Data Logger to store data in external databases for later use. We will learn to use all three data logger types Forge has to offer. These are SQL, CSV, and InfluxDB logging.
Also, if you prefer your tutorials in video format instead, you can watch our video on how to log data using the Data Logger on our YouTube channel.
During this tutorial, we’ll be using the following products:
- Prosys OPC UA Forge
- You can download an evaluation version through the request form.
- Prosys OPC UA Simulation Server
- You can download the free version through the product’s request form.
Tutorials
To start things off, start the Data Logger Module from the Dashboard.
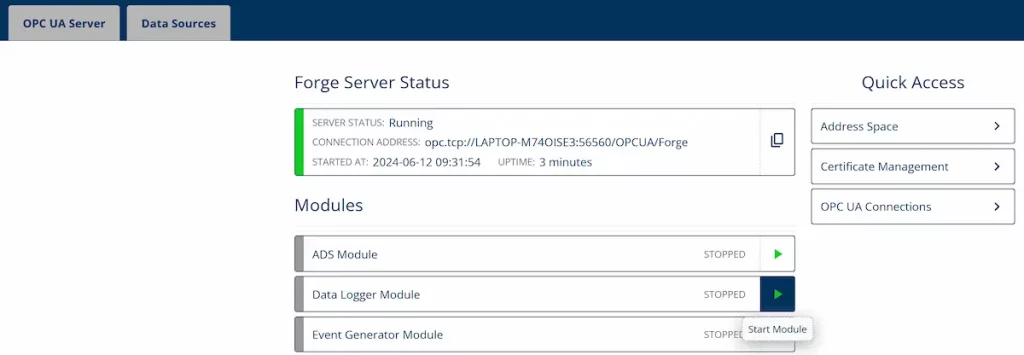
Select the data logger type you would like to use below.
- InfluxDB
- SQL
- CSV
InfluxDB Logging
In this section we will log data into InfluxDB. We assume you have installed it and know how to retrieve the necessary information for use in Forge.
1. Navigate to Data Logger > Data Sinks and press Add Sink.
- Give the Data Sink a name and select Influx as Sink Type.
- From InfluxDB, find your Organization Name and ID.
- Give your bucket a name and enable the switch on the right to allow Forge to create a new bucket.
- Fill in your InfluxDB API URL and Authorization Token. Then, press Add.
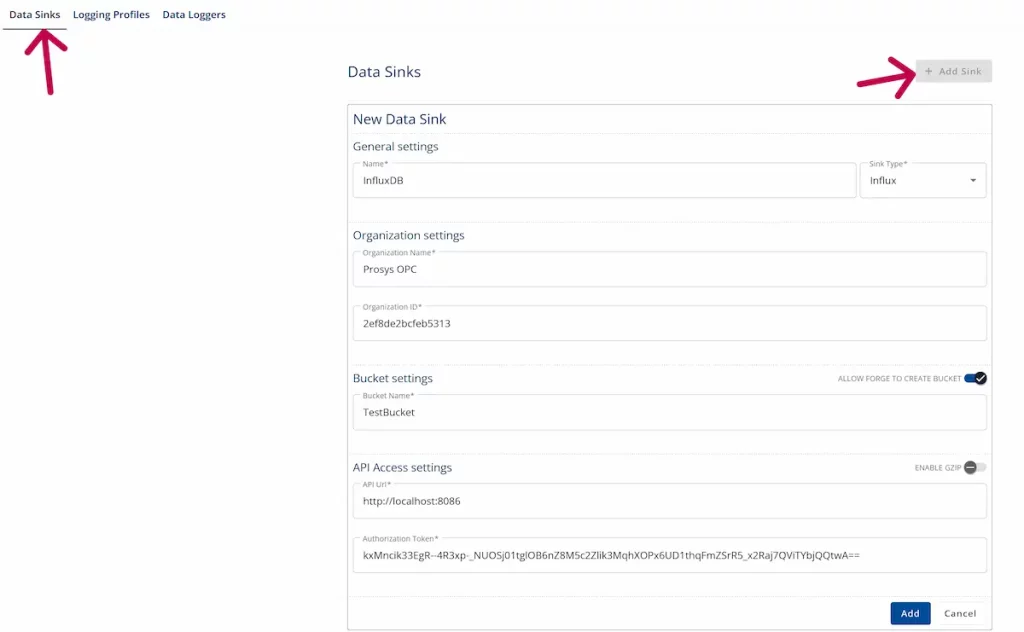
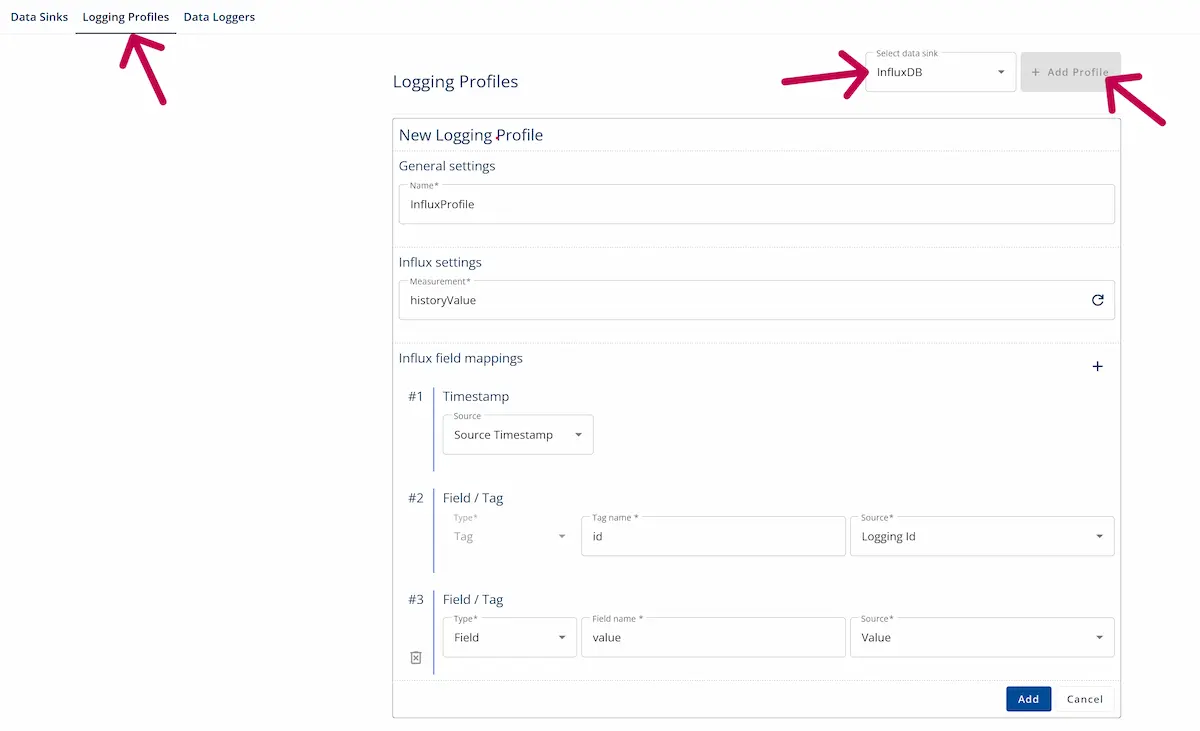
2. Under Data Logger > Logging Profiles, select the data sink defined in the previous step and click Add Profile. Give names for the Logging Profile and the Measurement. Finally, name the Influx columns according to their respective sources and press Add.
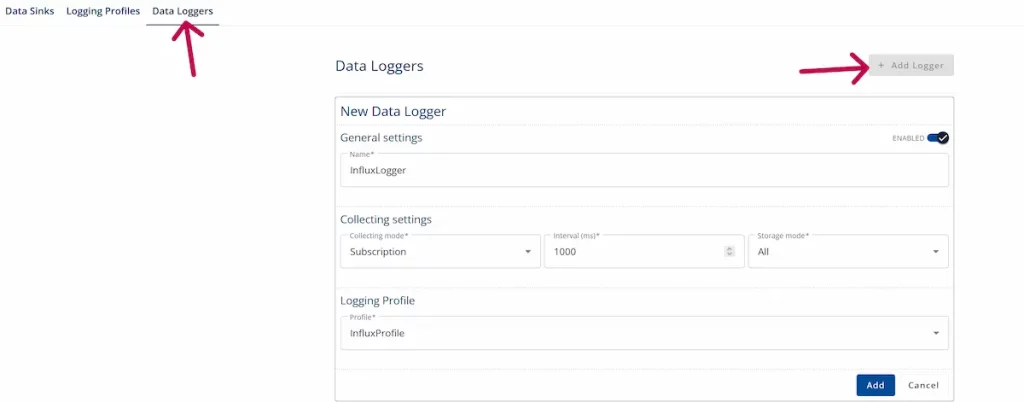
3. Go to Data Logger > Data Loggers and click Add Logger. Make sure that the logger is enabled, then name it and select the profile created in the previous step. Keep the default collecting settings and press Add.
4. From the Data Logger’s dropdown menu, click the + icon and search for a variable from the Simulation Server. We are going to select Sinusoid for this example.
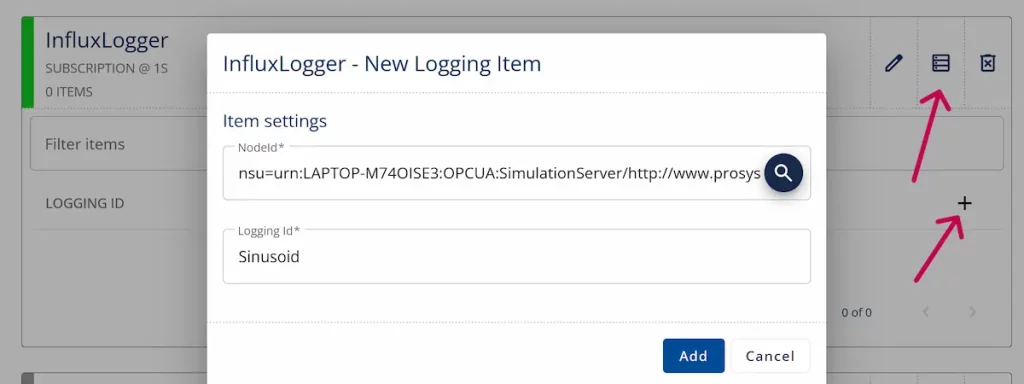
5. You should now be able to see the logged data on InfluxDB in the newly created bucket.
SQL Logging (PostgreSQL)
For SQL data logging, we’ll be using PostgreSQL, which you can easily install and use either from a UI or terminal client. Create the following table in your database that will be used to store the data:
CREATE TABLE TestTable (time TIMESTAMP, id TEXT, value FLOAT);
1. Navigate to Data Logger > Data Sinks, and press Add Sink. Here, we will define where the data will be stored.
- Give the Data Sink a name and select SQL as your Sink Type.
- Choose PostgreSQL as SQL Database Type. Then, enter the Hostname/IP, port number, and the Database name of your PostgreSQL.
- Authenticate using your PostgreSQL credentials and press Add.
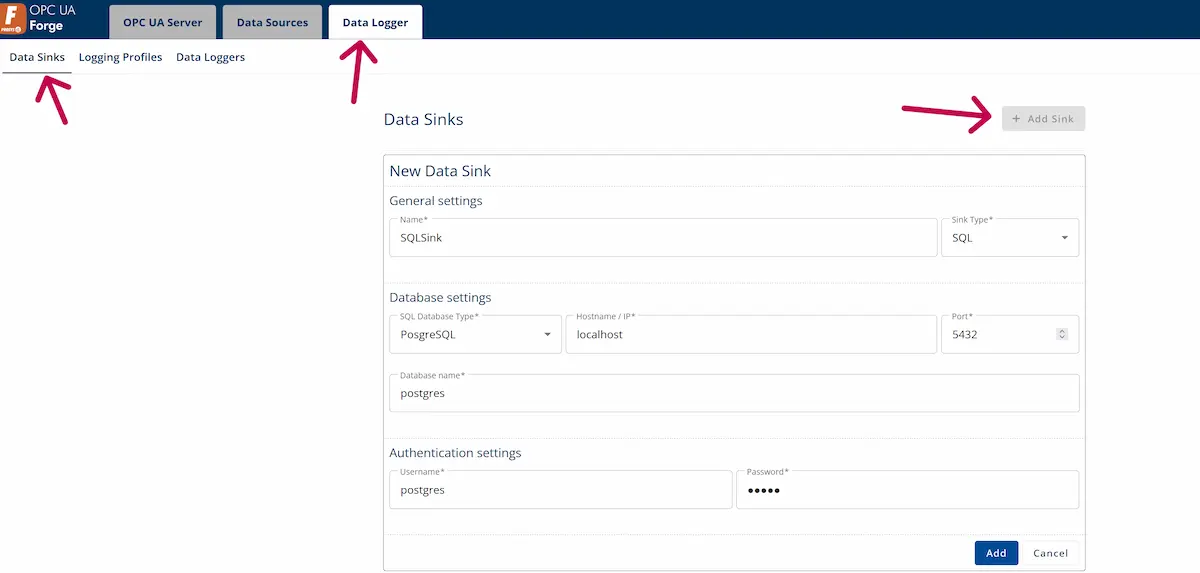
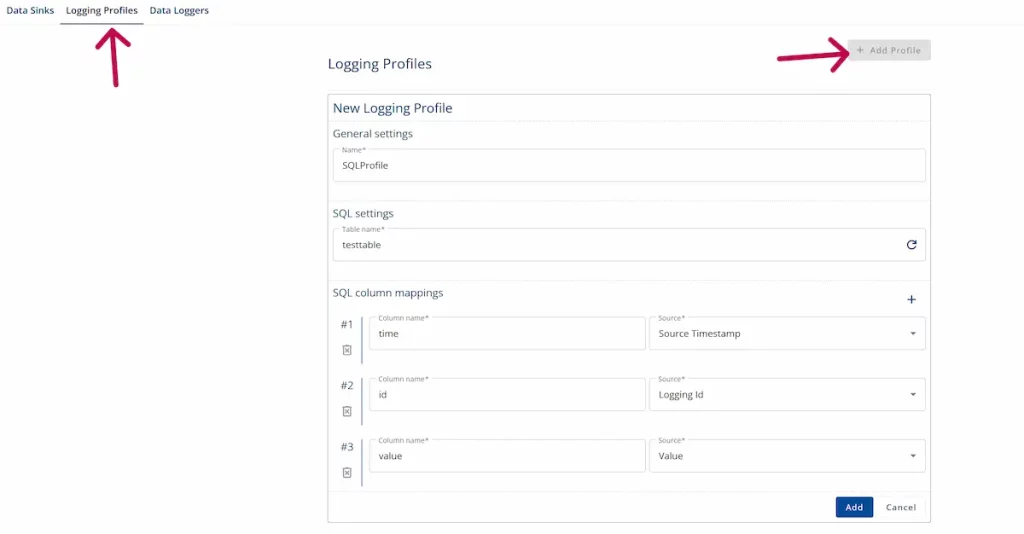
2. Under Data Logger > Logging Profiles, press Add Profile. Name the profile and select the table where the data will be logged. Finally, map the columns to their respective sources and press Add. Forge will automatically suggest the available table and column names if the connection to the database is successful.
3. Go to Data Logger > Data Loggers and click Add Logger. Make sure that the logger is enabled, then name it and select the profile created in the previous step. Keep the default collecting settings and press Add.
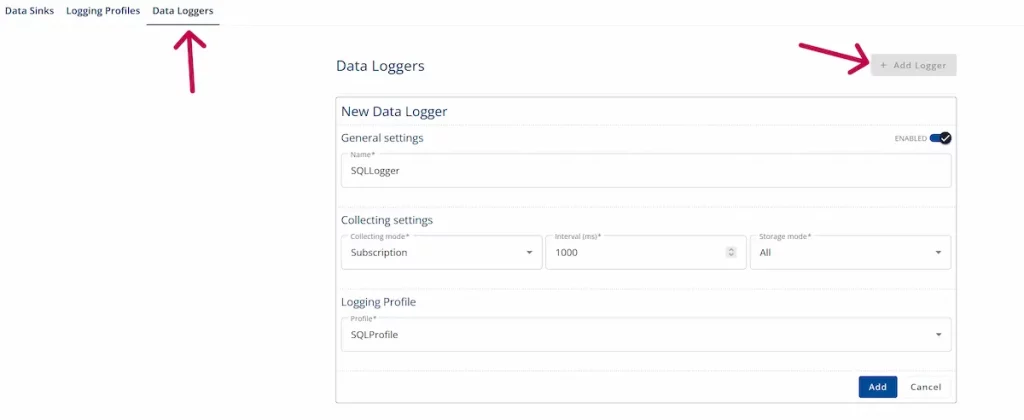
4. From the Data Logger’s dropdown menu, press the + icon and search for a variable from the Simulation Server. For this example, we will use Sinusoid.
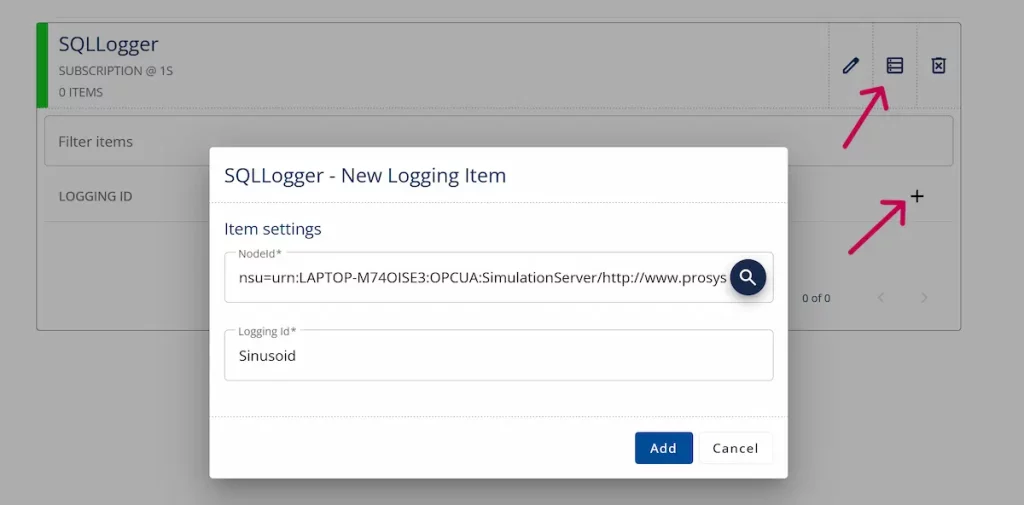
5. Forge will now start logging the data from the selected variable once per second. From PostgreSQL, you can check that the logging was successful using the following query:
SELECT * FROM TestTable;
CSV Logging
In this section we will log the data in CSV format.
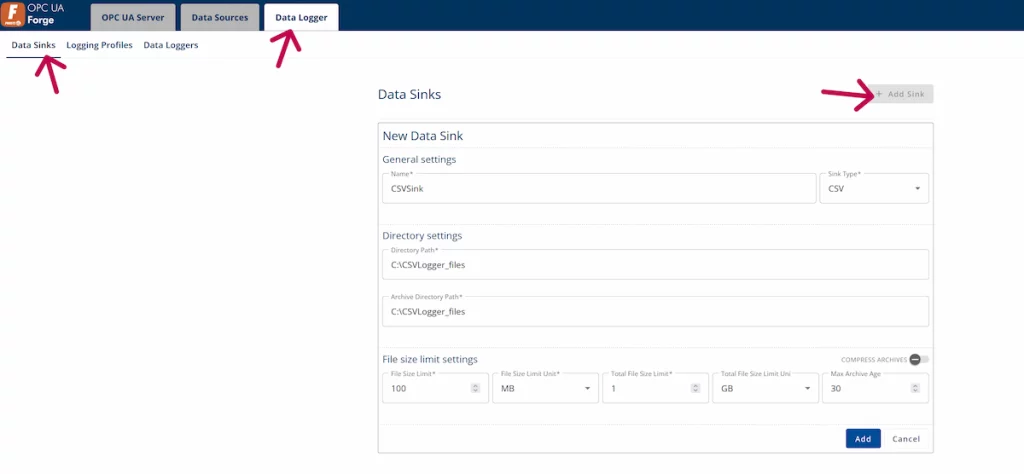
1. From Data Logger > Data Sinks, press Add Sinks. Name the sink and select CSV as your Sink Type. Select the directory from your computer where the logged files will be stored. The default File size limit settings are fine.
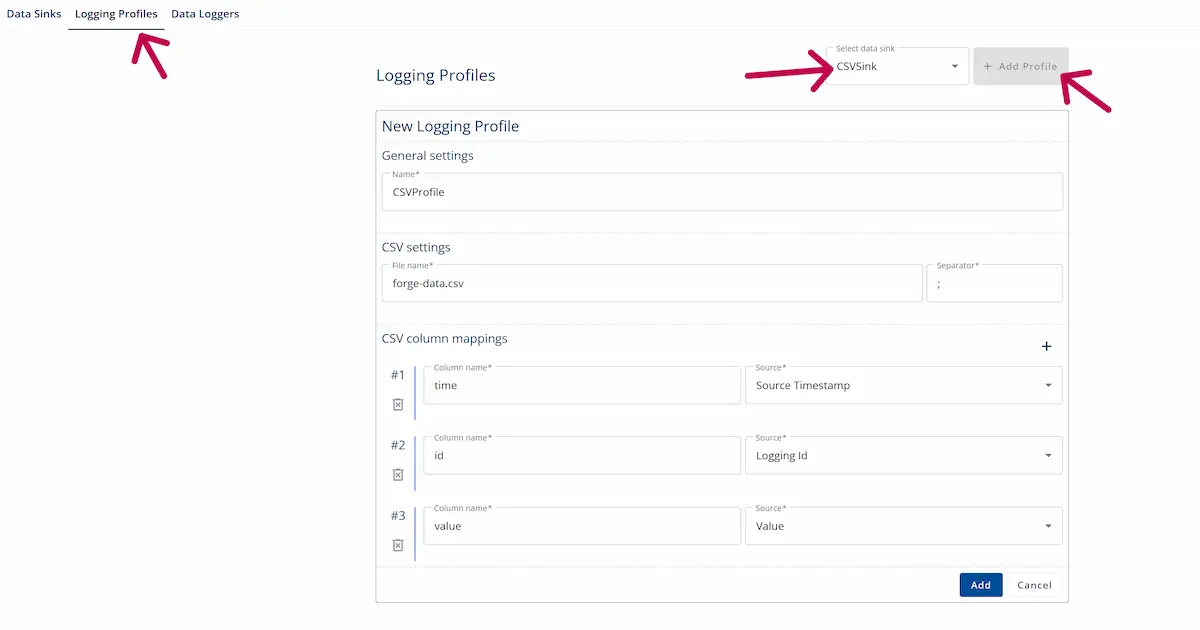
2. Next, navigate to Data Logger > Logging Profiles, select the previously defined CSV Data Sink from the dropdown menu on the right, and press Add Profile. Name the profile and the CSV file to be created, and choose a semi-colon (;) as the column Separator. After that, you can name the columns according to their respective sources. Press Add.
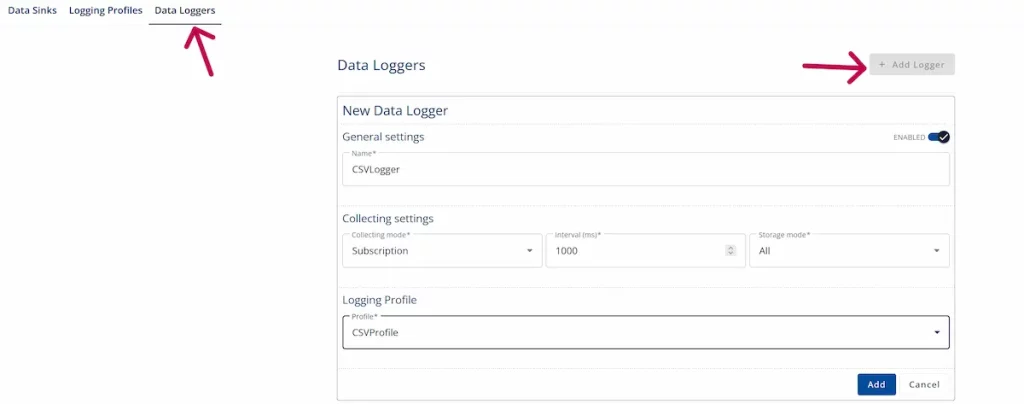
3. Go to Data Logger > Data Loggers and press Add Logger. Make sure that the logger is enabled, then name it and select the profile created in the previous step. Keep the default Collecting settings and press Add.
4. From the Data Logger’s dropdown menu, press the + icon and search for a variable from the Simulation Server. For this example, we will select Sinusoid.
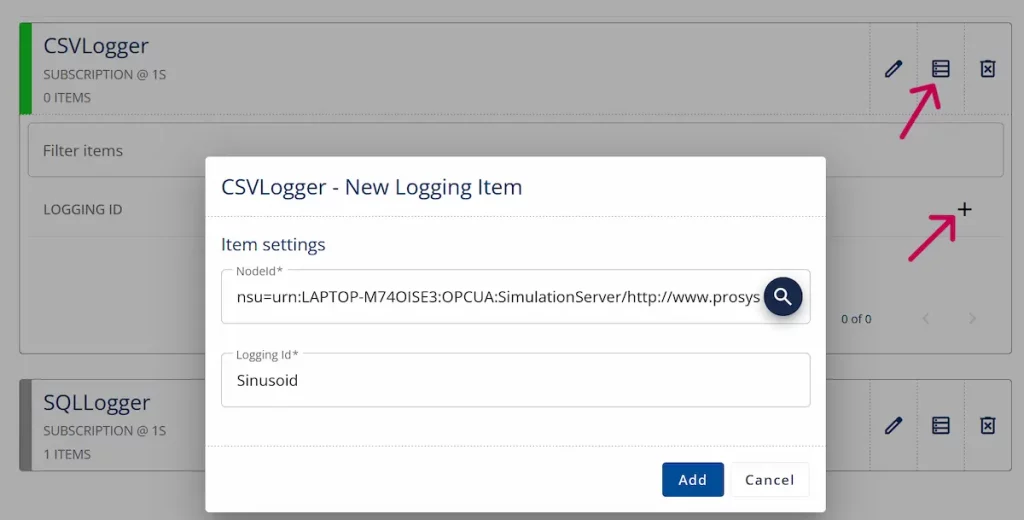
5. You can now open the CSV file and see the data that was logged.
Next Steps
This wraps up the 7th article in our Mastering Forge series. To recap, here is what we did:
- Started the Data Logger Module and configured data sinks for SQL, CSV and Influx.
- Created logging profiles for these data sinks to define how the data is logged.
- Added data loggers and stored Simulation Server data in the data sinks.
In the next article, Mastering Forge #8, we will learn to use reverse connections with Forge.
To learn more about Forge and its capabilities, request a detailed introduction by emailing sales@prosysopc.com or using our contact form. We’d be delighted to provide tailored information about Forge that aligns with your interests and requirements.
If you want to test Forge yourself, we can provide you with an evaluation license to get you started. You can request an evaluation license by emailing our sales team or filling out the request form.
Author Info

Iivo Yrjölä
Customer Integration & Support, Prosys OPC
Email: iivo.yrjola@prosysopc.com
