
Forge Type Designer: Build and Scale Your System
Every plant has similar devices and equipment, such as motors, pumps, conveyors and packing lines. Also more specialized machines can appear in large numbers across the enterprise. Yet in many systems each one still turns up as an unstructured collection of individual tags for measurement and control. As a result, the same structure has to be built by hand for every piece of equipment or machine of the same kind.
A flat tag list is also a poor way to present the data. It shows names and values, but not which machine a value belongs to, how the values relate to each other or what they mean, such as engineering units. Every operator, dashboard and application has to work that out again from naming conventions and documentation.
Information modelling is the answer, and it is not new to Prosys Forge. You have for a long time been able to import standard NodeSets, either as files or directly from our Cloud Library, as well as custom NodeSets created with different modelling tools. Creating your own types, however, has always had to be done outside Forge, in a separate modelling tool.
In Forge 2026.2, the new Type Designer handles that. It lets you create your own information models directly in Forge. You describe what a pump is once, as a type, and every pump you add after that follows the same structure automatically.
This post walks through how to build your first type with the Type Designer and how to put it to work across your plant. If you prefer to follow along in video format, you can watch the accompanying video.
There are two ways to create your own OPC UA types in Forge. The first is to build the type from scratch in the Type Designer and then create instances of it. The second is to extract an existing node structure into a type, which can then be instantiated like any other. The steps below follow the first method, and the second one is covered in the next section.
Creating your own type from scratch
This approach is ideal when you already know the structure you want to reuse and want to define it before creating any instances.
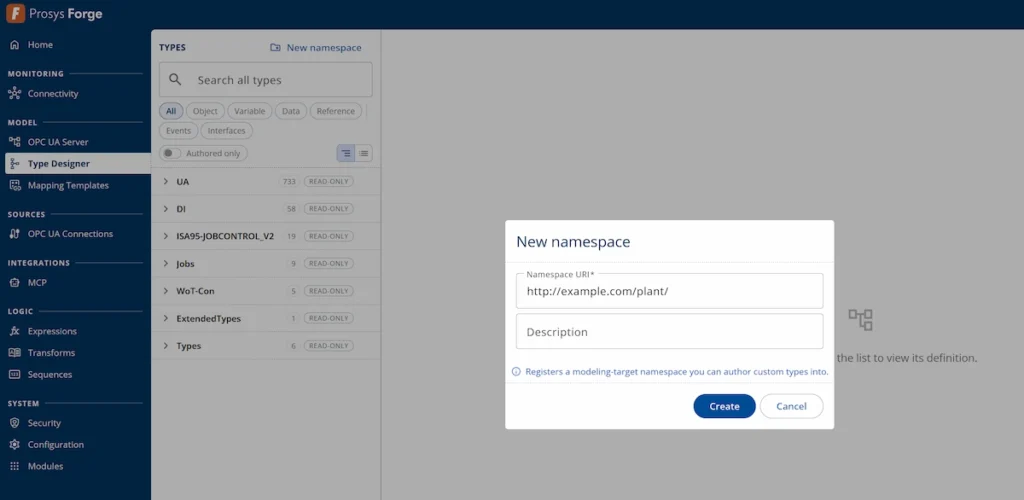
1. Create a namespace. Open Type Designer and click New namespace and give it a URI, e.g. http://example.com/plant/.
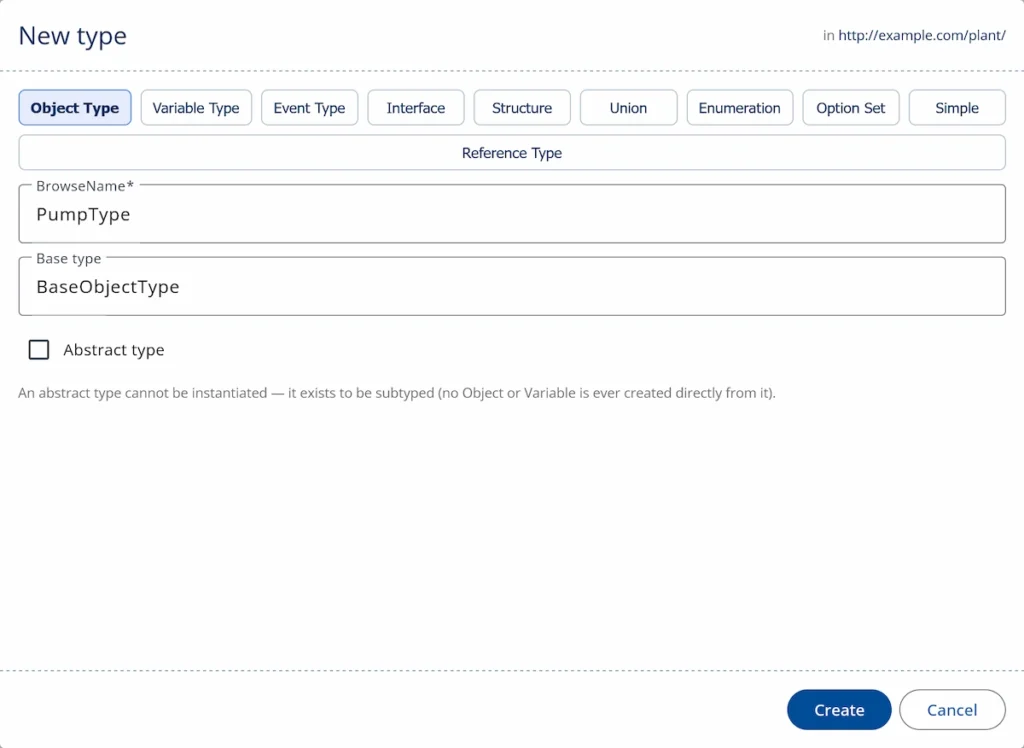
2. Create the type. Click the plus-icon of the created namespace and add an Object Type named PumpType, using BaseObjectType as Base type. Object types are just one option. You could also create variable types, event types, interfaces, reference types and data types such as structures, unions, enumerations and option sets.
3. Add child nodes. From the Add child button, you can add child nodes under PumpType.
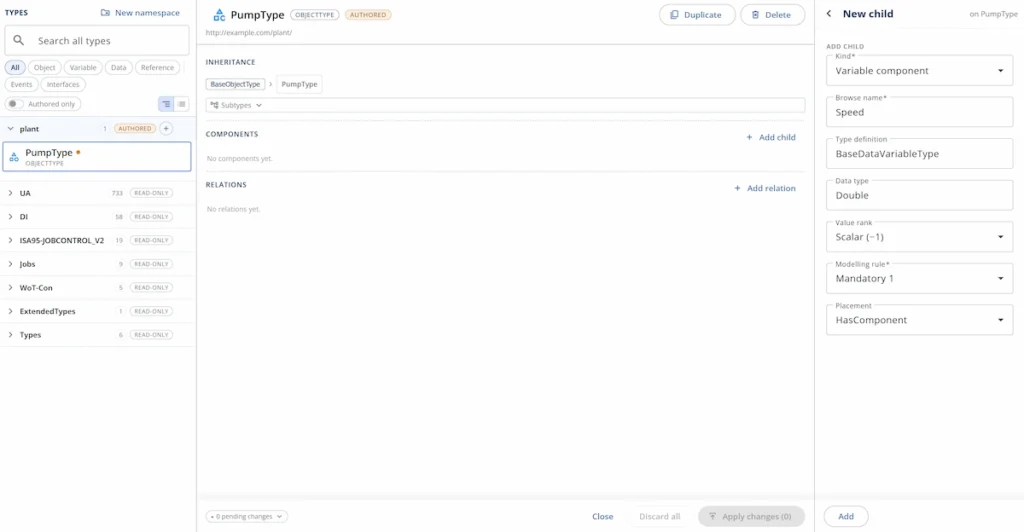
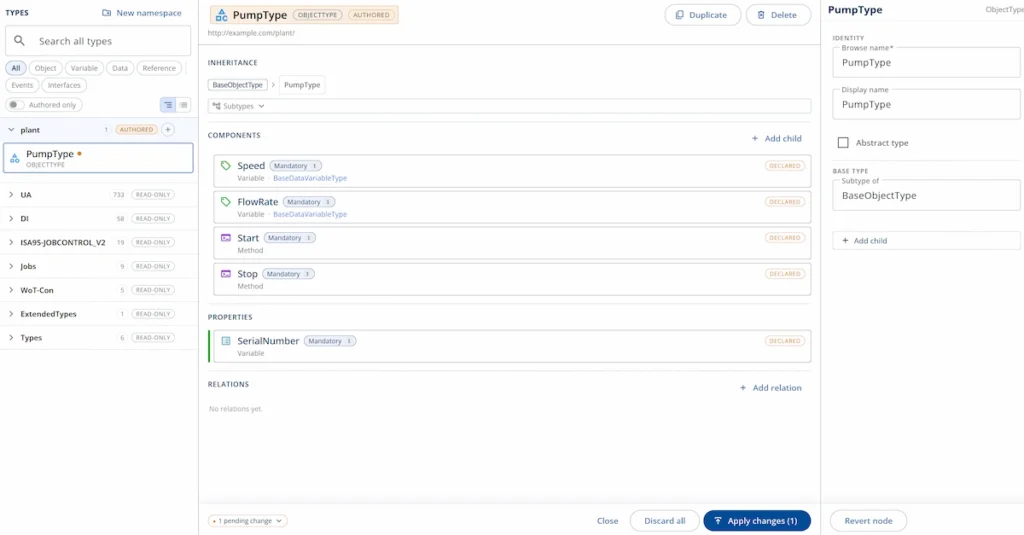
4. Add Speed and FlowRate as variables, SerialNumber as a property and Start / Stop as methods. Finally, click Apply changes.
5. Once the PumpType has been created, it can be easily used to create instances in Forge’s address space. As you can see, all the pumps (Pump1 and Pump2) of this type have their identical child nodes automatically created. Now all that is missing is to map the variables to the data sources and in this model, defining the logic for the methods (Start and Stop).
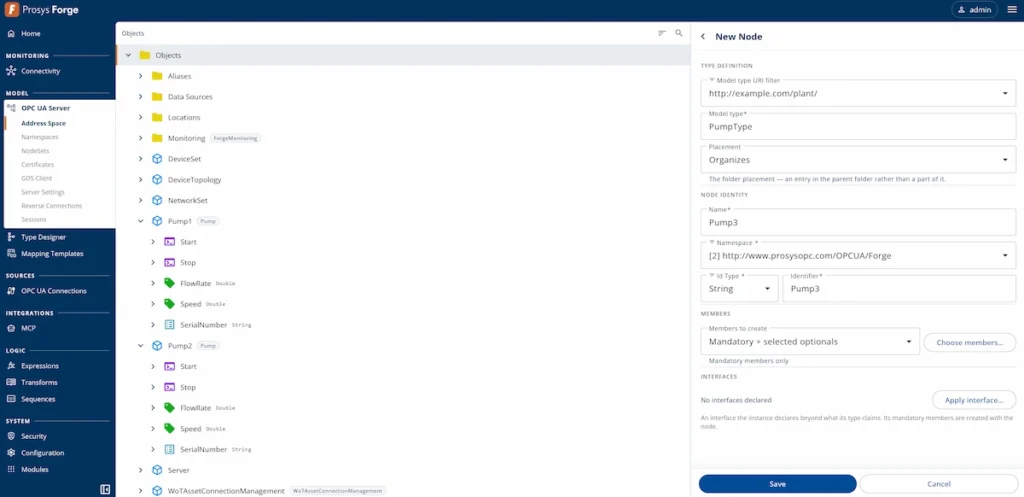
Extracting type from an instance
This approach is ideal when you’ve already built and refined a node structure and want to reuse it. You can turn that structure into a type and create additional instances easily.
1. Create a node instance. Here, we have created Pump1 similar to the one in the previous chapter, but this time we have built its type from base node types.
2. Extract the type. By right-clicking the Pump1 node, select Extract→Type…
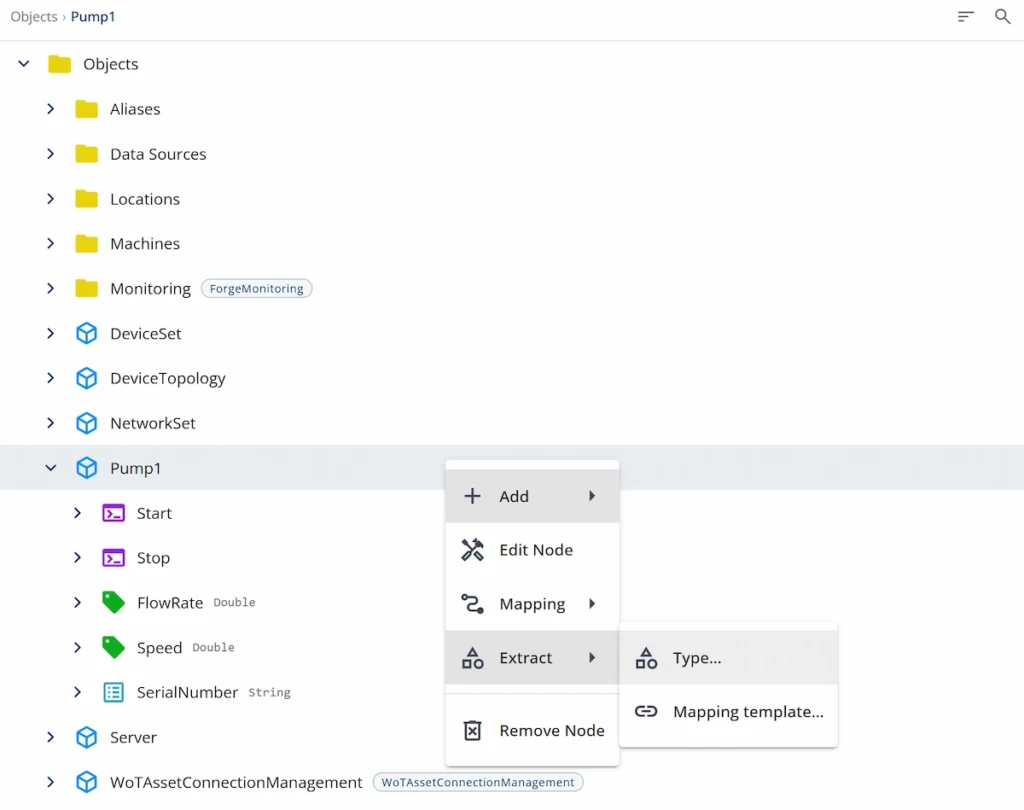
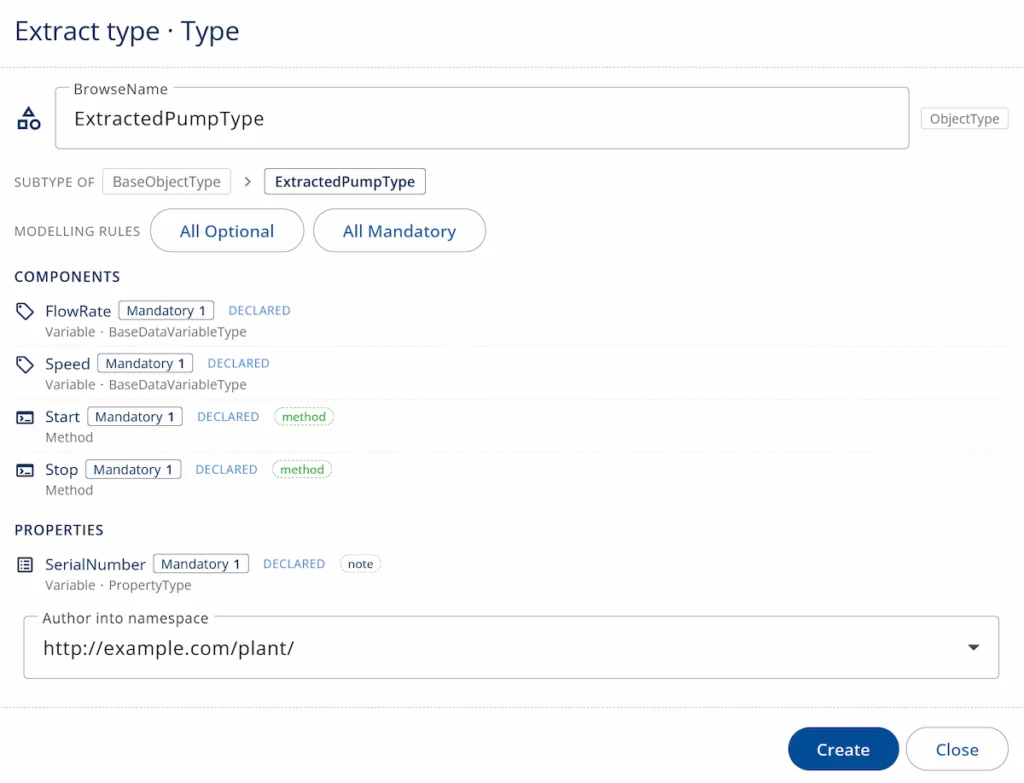
3. Name the type: Here, we changed the suggested type name to ExtractedPumpType as it would have collided with the type we created in the previous chapter. In addition, you can select the child nodes to be mandatory instead of optional. Finally, we may use the previously created namespace and click Create.
4. Convert the old node instance: By simply clicking Next, the Pump1 instance created in Step 1 will be converted to the new type ExtractedPumpType.
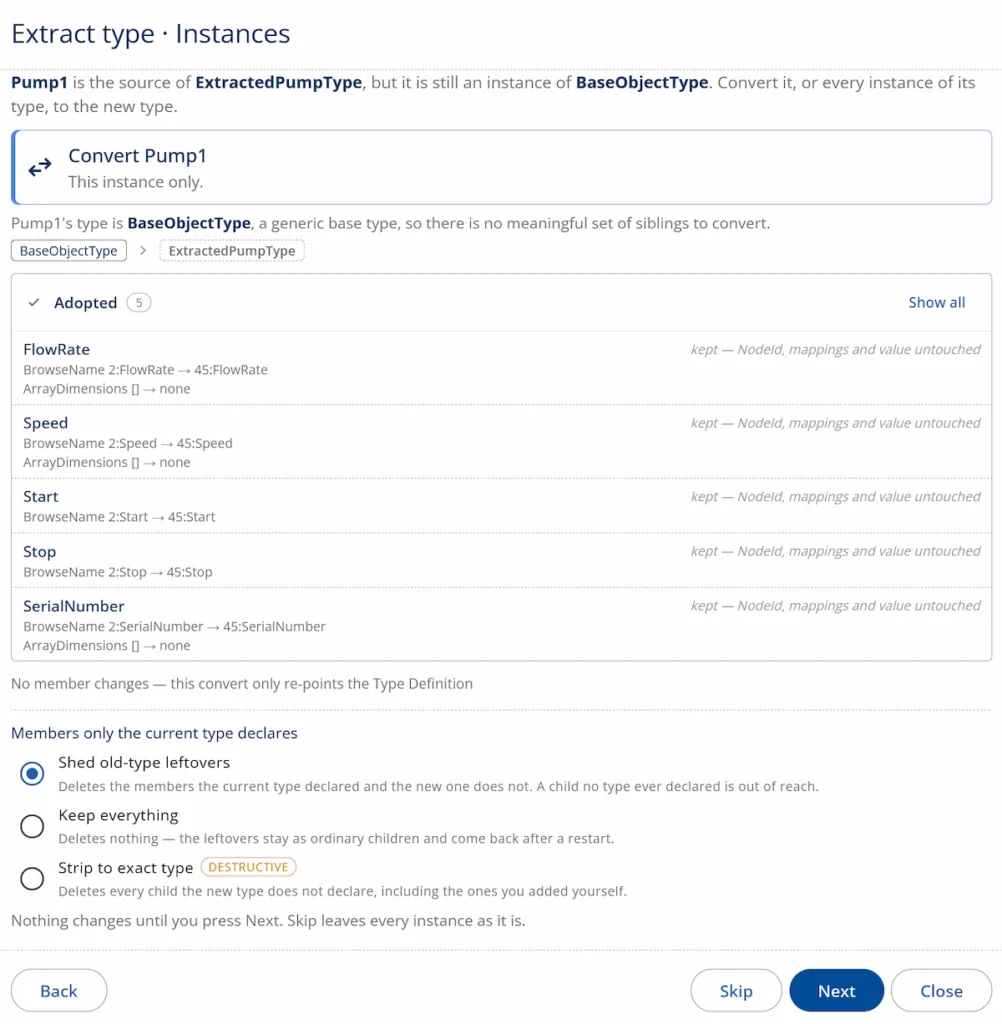
5. After this, the newly extracted type can be seen in the Type Designer. You’ll now be able to easily create multiple instances of this type in the address space as done in the Step 5 of the previous chapter.
Conclusion
With the Type Designer in Forge 2026.2, you can define reusable OPC UA types directly in Forge, either by designing a new structure from scratch or by extracting one you’ve already built. Both approaches let you describe equipment and machines once and create instances with a consistent structure, reducing repetitive work and making the data easier to understand and use.
Once your type is ready, create the instances you need, map their variables to your data sources and define any method logic. Whether you’re modelling motors, pumps, conveyors, packing lines or more specialized machines, the result is a reusable foundation for organizing data across your plant.
If you want to learn more about Forge and its capabilities, you can check these Forge resources or request a detailed introduction by emailing sales@prosysopc.com or using our contact form. We’d be delighted to provide tailored information about Forge that aligns with your interests and requirements.