This guide shows how to record OPC UA values to CSV files with Prosys OPC UA Browser and run a playback of those values in Prosys OPC UA Simulation Server. This allows for a quick way to reproduce field scenarios for demos, testing, and diagnostics.
Prerequisites
-
- Prosys OPC UA Browser – Professional Edition, for data logging and NodeSet export
-
- Prosys OPC UA Simulation Server – Professional Edition, for NodeSet import and running playback based on logged data
If you wish to try Playback with a test datalog, you can download one from this link. It contains data for the default Simulation Server variables, so you don’t need to use any NodeSet-file.
Record CSV Files with Browser’s Data Logger
-
-
- Connect to the source OPC UA server in Browser.
- Open Data View and select the variables to log.
- Click Settings… in the Data View toolbar to open Data Logging Settings.
- Click Default Settings (if the settings are not default)
- Check Enabled to start recording
- Click OK
-

You can also use the produced CSV files as examples if you create logs with your own tooling or use the one provided in this blogpost.
Export the NodeSet from the Source Server
The Simulation Server needs the same namespaces and type definitions to mirror your address space for playback to work properly.
- Add NodeSet Export View.
- Click Export or Show Advanced View if you want to select only specific namespaces to export

Import the NodeSet to Simulation Server
- Start Prosys OPC UA Simulation Server and ensure a Professional or Evaluation license is active.
- Open Namespaces and select Import NodeSet…. Choose the file(s) exported above.
- Verify the objects under Objects Tab. The structure should match your source server and include the nodes that you wish to playback.
Open Playback
- In Simulation Server open Playback from the top of the Objects tab.
- Click + button and choose one or more CSV logs recorded with Browser’s data logging.

Controls and Options
At the top of the playback view, you can see various ways to configure and control the playback:
-
- Play, Pause and Stop
- Step forward, Step backward using the up and down arrow-buttons, or Jump to the next breakpoint. These controls are available when the playback is paused.
- Playback speed multiplier to adjust the speed of the playback
- Search for a row using the timestamp of that row
- Use current time. When off, the server uses the
SourceTimestampfrom the CSV. When on, values are emitted using the current wall-clock time. The Timestamp column will be calculated when playback is started based on the current time. - Loop at end restarts the playback automatically when the end position is reached and will restart from start position after defined delay has been waited.
On the left side, we can see a list of loaded files and row markers:
-
- + button to add CSVs to playback or – to remove selected file from the list
- Clear Breakpoints to clear all set breakpoints. You can also scroll to the row by selecting from the breakpoint list.
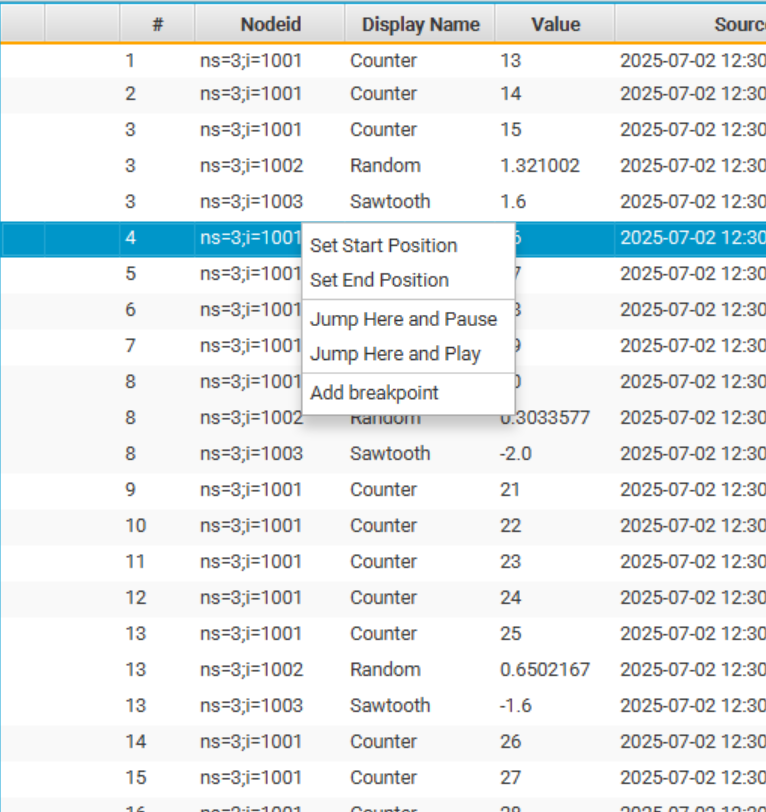
Additionally, right-clicking a row in the table allows you to:
-
- Set Start Position and Set End Position to define the start and end boundaries for the playback.
- Jump Here and Pause/Play to start the playback from a position and either continue directly from that row or pause to it.
- Add breakpoint to pause the playback when that row is reached
When playback is running, the Server variable values will be set according to the log.
